Setting up Windows version: Difference between revisions
No edit summary |
|||
| (222 intermediate revisions by 9 users not shown) | |||
| Line 1: | Line 1: | ||
{{FloatingTOC|side=right}} | |||
==Introduction== | |||
This guide explains how to download, install and properly configure '''PCSX2''' on '''Windows'''. It will also give some tips on how to use PCSX2 more efficiently. Keep in mind that the guide was written for PCSX2 '''v1.6.0''' and '''v1.7.0''' but can still be used for other versions of the emulator. If something in this guide seems confusing, please feel free to ask for help in [https://discord.com/channels/309643527816609793/315544036184293386 the official PCSX2 Discord.] | |||
There is a [[Setting up Linux version|Linux]] version of this guide. | |||
==Overview== | |||
[[PCSX2]] is a [https://en.wikipedia.org/wiki/PlayStation_2 PlayStation®2] emulator capable of running commercial games. It is a free and open-source project that runs on Windows and Linux. A Mac version ceased development in 2012, but with the introduction of Apple's M1 SoC, [https://forums.pcsx2.net/Thread-Native-Mac-Testing-Build development of a new macOS version] is now ongoing, spearheaded by developer TellowKrinkle. | |||
Like its predecessor project [https://en.wikipedia.org/wiki/PCSX-Reloaded PCSX] (a PlayStation®One emulator), it is based on a [https://en.wikipedia.org/wiki/PSEmu_Pro PSEmu Pro] spec plug-in architecture, separating several functions from the core emulator. However, as of v1.7.1420, plug-in functionality has been merged into the core emulator. PCSX2 requires a copy of the PS2 BIOS, which is not available for download from the developers due to the copyright concerns and legal issues associated with it. | |||
= | ===Release cycle=== | ||
PCSX2 | PCSX2 operates on a hybrid rolling–stable release cycle. Rolling releases are odd-numbered (for example, 1.7.0), while stable releases are even-numbered (for example, 1.6.0). The stable release is not subject to change, while the rolling releases (known as nightlies) receive optional updates on a daily or – often – more-than-daily basis. The nightlies are the bleeding edge of what PCSX2 has to offer and are therefore often faster, more accurate, and more feature-rich. However, while updates to the nightlies are tested, they sometimes introduce small regressions – issues that weren't present before. Moreover, the location of settings is sometimes moved between rolling release versions. Some users may therefore find it more preferable to remain on the stable version. | ||
==Requirements== | |||
===BIOS=== | |||
You will need the BIOS files from '''''your own''''' PlayStation®2 console. They are not included with PCSX2 since they are copyrighted by Sony. Without them you won't be able to use the emulator at all, since PCSX2 requires these binaries to work. You'll find more information on how to dump/download the BIOS from your PS2 console [[#BIOS|later in this guide]]. | |||
===Minimum requirements=== | ===Minimum requirements=== | ||
These are the minimum system requirements to run PCSX2 | These are the minimum system requirements to run PCSX2. Bear in mind, however, that most games will be slow or even unplayable with these specs: | ||
*CPU: | {{SpoilerTable|caption=Expand Settings|text=Settings | ||
*GPU: | * OS: | ||
* | :* Windows 7 or newer (32-bit or 64-bit; as of 1.7, Windows 7 is no longer supported) | ||
=== | *CPU: | ||
:* SSE2 support (Pentium 4 and up, Athlon64 and up; as of 1.7, this has changed to any that supports SSE4) | |||
:* [https://www.cpubenchmark.net/singleThread.html PassMark Single Thread Performance] rating near or greater than 1600 | |||
:* Two physical cores, with hyperthreading | |||
*GPU: | |||
:* Direct3D10 support | |||
:* OpenGL 3.x support | |||
:* PassMark G3D Mark rating around 3000 (GTX 750) | |||
:* 2 GB of video memory | |||
* RAM: | |||
:* 4 GB of memory | |||
}} | |||
<!--Note that Windows XP will no longer be able to run PCSX2 compiled under modern MS Visual Studio by default (unless Windows XP is specified as a target [http://blogs.msdn.com/b/vcblog/archive/2012/06/15/10320645.aspx before building]).--> | |||
===Recommended requirements=== | |||
These are the recommended system requirements to run PCSX2: | These are the recommended system requirements to run PCSX2: | ||
*Windows | {{SpoilerTable|caption=Expand Settings|text=Settings | ||
*CPU: | * OS: | ||
*GPU: | :* Windows 10 (64-bit) or Windows 11 | ||
*RAM: | * CPU: | ||
{{ | :* [https://en.wikipedia.org/wiki/Advanced_Vector_Extensions#CPUs_with_AVX2 AVX2 support] | ||
=Getting PCSX2= | :* [https://www.cpubenchmark.net/singleThread.html PassMark Single Thread Performance] rating near or greater than 2100 | ||
:* Four physical cores, with or without hyperthreading | |||
*GPU: | |||
:* Direct3D11 support | |||
:* OpenGL 4.5 support | |||
:* Vulkan 1.1 support (Vulkan renderer is currently only available in 1.7.2208 and up) | |||
:* PassMark G3D Mark rating around 6000 (GeForce GTX 1050 Ti) | |||
:* 4 GB of video memory | |||
* RAM: | |||
:* 8 GB of DDR3, DDR4, or DDR5 memory | |||
}} | |||
{{Tip|Because of the complex nature of emulation, even if you meet the recommended requirements there will be games that will '''NOT''' run at full speed due to emulation imperfection, floating point emulation differences, issues with emulator itself or other problems.}} | |||
==Getting PCSX2== | |||
There are two versions of PCSX2 1.6.0 available for download: standalone installer and Windows binaries. There are also nightly builds (1.7.x). | |||
* '''[https://pcsx2.net/download/releases/windows.html Standalone installer and Windows binaries can be found here.]''' | |||
* '''[https://pcsx2.github.io/downloads.html Nightlies can be found here.]''' | |||
===Standalone Installer=== | ===Standalone Installer=== | ||
This | [[image:160_setup_1.png|400px|thumb|right|The first screen in the installation menu for PCSX2 1.6.0.]] | ||
This is the default option for most stable build users. The installer will contain the latest stable version of PCSX2. After opening it, you will be able to select the installation options. | |||
First, you will be asked to provide the location for PCSX2 to install. 'Normal Installation' will install itself in your Program Files or another specified destination folder while storing user files (such as memory cards, save states, etc.) in a folder called 'PCSX2' in your 'Documents'. 'Portable Installation' will consolidate PCSX2 to one folder which you designate. Regardless of which you pick, you can also elect to create a start menu shortcut and a desktop shortcut; these are selected by default. After that, you will be able to customize which folder PCSX2 will install to. When you are satisfied with your selection, click 'Install', and the emulator will be installed to the chosen location. | |||
<!--The installer will also create the following folders under the user's ''My Documents'' folder (Those folders can be changed to a different location anytime you want. See [[#Folders|'''Folders''']] section of this guide for more information). | |||
< | *''bios'': This is where you should place your BIOS files. By default PCSX2 will look for BIOS in this folder. | ||
*''cheats'': Cheats will be stored and read from here. Cheats are the files with .pnach extension. | |||
*''bios'': This is where you should | *''inis'': This folder is responsible to store emulator's configuration files. You can tell PSCX2 to load different configuration files for different games by creating a shortcut for pcsx2.exe with certain [[Command-line support|command line arguments]]. | ||
*''cheats'': Cheats will be stored and read from here. | |||
*''inis'': This folder is responsible to | |||
*''logs'': Emulator logs are going to be stored here. | *''logs'': Emulator logs are going to be stored here. | ||
*''snaps'': Screenshots | *''snaps'': Screenshots are stored into this folder (use ''F8'' to take a screenshot in game). | ||
*''sstates'': [[Savestate]]s are stored here. | *''sstates'': [[Savestate]]s are stored here.--> | ||
{{Warning|Remember that savestates made with a certain version of PSCX2 won't be compatible with other versions of the emulator. | |||
{{ | |||
'''Save your game's progress on your memory card before updating PCSX2!'''.}} | '''Save your game's progress on your memory card before updating PCSX2!'''.}} | ||
===Windows binaries=== | ===Windows binaries=== | ||
This option download the | This option is recommended for advanced users. You will download the archive containing the Windows binaries. You should then unpack it in a desired location and run '''pscx2.exe'''. Start menu entries or a desktop shortcut will not be created automatically. This is the ideal solution if you want to keep the application portable. You will need [https://www.7-zip.org/ 7-Zip] to decompress the files and the [https://aka.ms/vs/17/release/vc_redist.x86.exe Visual C++ 2015–2019 x86 Redistributable package] for this version to work. | ||
This is ideal if you want to keep the application portable. You will need [ | ===Nightly builds=== | ||
These "bleeding edge" builds are considered unstable but are perfect for those who wish to try out new PCSX2 features before they are released in an official stable build. Nightly builds can be downloaded [https://pcsx2.github.io/downloads.html here]. They do not need to be installed. | |||
The emulator is | |||
==Running PCSX2 for the first time== | |||
PCSX2 has the first run configuration wizard to help you with configuration. The emulator will automatically store all settings, memcards and any new configuration related files in your ''My Documents'' folder if you used the installer, or in the same folder where ''pcsx2.exe'' is located if you downloaded the binary version. | |||
After installation, if you run PCSX2 for the first time, it will initiate a first-time configuration. The first step of this short process is selecting your preferred language. This can be changed at any time after setup. | |||
[[image:First Time Configuration 1.png|400px|thumb|center|The language selection screen in the setup menu for PCSX2 1.6.0.]] | |||
{{Clear new paragraph}}In the next screen you will be able change the plugins you want to use. The plugins selected by default are the most compatible ones and will usually perform better. Do not change anything here if you are not yet familiar with PCSX2. | |||
You can also specify a different folder for your plugins if you want, by unchecking the ''use default setting'' checkbox and selecting a folder of your choice by clicking ''Browse''. ''Open in Explorer'' button will simply open a file explorer window in the folder you have specified. | |||
[[image:PCSX2_Wizard_2.png|400px|thumb|center|Click to enlarge]] | |||
{{Clear new paragraph}}[[image:PCSX2_Wizard_3.png|400px|thumb|center|Click to enlarge]] | |||
{{Clear new paragraph}}In the third screen, you will be prompted to select one of your BIOS images from the list. If you can't see anything in this list, you need to either copy your BIOS files in the folder shown below, or change that folder to point to a location where BIOS images are saved. For more information about the BIOS, check the [[#BIOS|BIOS configuration section]] of this guide. Note that you will not be able to use PCSX2 without a proper BIOS image. | |||
To finish the configuration process press ''Finish'' button. You will be taken to the main GUI (Graphical User Interface) of PCSX2: | |||
[[File:PCSX2GUI.png|center]] | |||
From ''Config'' menu using ''Plugin/BIOS'' item, you can review and change the above settings or plugins used by PCSX2 at any time. More information about plugins will be given in the following section of the guide. | |||
=Configuration= | |||
''The Component Selector'' is the plugin and BIOS configuration window that opens when you select '''Config => Plugin/Bios Selector'' in 1.6.0. It has three tabs: Plugins, BIOS and Folders. In later versions of 1.7, plugins are removed, and the BIOS and Folders tabs are under 'General Settings'. | |||
==Plugins== | |||
'''''Plugins have been merged into the core emulator as of 1.7.1420. Settings are similar between 1.6.0 and non-plugin versions, but you will not need to select plugins if you are running 1.7.1420 or above.''' | |||
[[image:Plugin_select.png|400px|thumb|left|Click to enlarge.]] | |||
PCSX2 1.6.0 is a plugin-oriented program. Your ''pcsx2.exe'' is the main processor that can emulate the real PS2 on the PC, but it does not work alone. It needs a graphics plugin to display the game graphics and a sound plugin to play the game sounds and music, and it also needs a pad plugin to allow you to play using your keyboard, mouse or gamepad. All plugins are stored (by default) in the ''plugins'' folder of your main PCSX2 folder. | |||
'''Warning: If you select a plugin you will not be able to configure it until you press ''apply'' button!'''<br/> | |||
The plugin configuration page will look like this (see the picture on the left). | |||
{{Clear new paragraph}} | |||
===Graphics (GS) plugins=== | |||
[[image:GSDx2.png|thumb|right|GSdx]] | |||
GS plugins are used by PCSX2 to provide the graphical output on the screen (i.e. to render the picture). The default PCSX2 1.6.0 installation has three different GS plugins for you to select from: | |||
* GSdx 1.2.0 (AVX2) | |||
* GSdx 1.2.0 (SSE4/AVX) | |||
* GSdx 1.2.0 (SSE2/AVX) | |||
These are the same plugin compiled using different optimization instructions sets. You must use only the versions supported by your CPU otherwise the emulator may crash. The difference between these versions speed-wise is minuscule and only some games are showing any improvements in speed when using more optimized version. So if you are unsure, your safe choice is the SSE2 version. The three above are listed in order from fastest to slowest. | |||
Note to AMD users: please do '''NOT''' confuse SSE3 with SSSE3 (1 extra S) and SSE4A with SSE4.1, they are totally different and are '''NOT''' supported on AMD systems before Bulldozer/Bobcat. Please fall back to the SSE2 plugin instead in case your system has an older CPU. | |||
Note | |||
{{Tip| | {{Tip| | ||
*'''SSE2''' supporting CPUs: [http://en.wikipedia.org/wiki/SSE2#CPUs_supporting_SSE2 Check here] | *'''SSE2''' supporting CPUs: [http://en.wikipedia.org/wiki/SSE2#CPUs_supporting_SSE2 Check here] | ||
| Line 127: | Line 141: | ||
*'''AVX2''' supporting CPUs: [http://en.wikipedia.org/wiki/Advanced_Vector_Extensions#CPUs_with_AVX2 Check here] | *'''AVX2''' supporting CPUs: [http://en.wikipedia.org/wiki/Advanced_Vector_Extensions#CPUs_with_AVX2 Check here] | ||
You can also use [http://www.cpuid.com/softwares/cpu-z.html CPU-Z] to find out your processor's supported | You can also use [http://www.cpuid.com/softwares/cpu-z.html CPU-Z] to find out your processor's supported instruction set.}} | ||
instruction set.}} | |||
To use the | To use the Direct3D 11 renderer, you will have to be running Windows. | ||
'''Adapter''' | '''Adapter'''<br /> | ||
<br /> | This option will allow you to select what graphics adapter GSdx will use. It is especially useful for computers which have a dedicated graphics card and an onboard graphics chip, so that user can specify the dedicated graphics card explicitly. | ||
'''Renderer''' | '''Renderer'''<br /> | ||
<br /> | This option allows you choose the interface through which the graphics will be rendered. In 1.6.0, the renderer options are as follows: | ||
* | {{SpoilerTable|caption=Expand Renderers|text=Renderers | ||
* ''Direct3D 11 (Hardware)'': GSdx will use Direct3D10/11 mode which is often faster and usually more compatible as well. It is '''recommended''' to use this option if your system supports it. | |||
* ''Direct3D 11 (Software)'': GSdx will use its built-in software renderer which will not utilize your graphics card at all. The image will be rendered solely by your CPU. This will greatly reduce the rendering speed, but this is the most compatible mode. This option is recommended if you encounter graphics bugs with the hardware renderer. | |||
* ''"OpenGL (hardware)"'': GSdx will use the OpenGL interface to render the image. This option is generally slower than Direct3D 11, but it often provides more accuracy. | |||
* ''"OpenGL (software)"'': GSdx will use the OpenGL backend in software mode. Similar to Direct3D 11. | |||
* ''None (Core Benchmark): The plugin will not render anything in these modes, thus not giving any output on the screen. It's useful for debugging purposes only. | |||
}} | |||
In the latest 1.7.x builds, the renderer options are: | |||
{{SpoilerTable|caption=Expand Renderers|text=Renderers | |||
* | * ''Direct3D11'': This option is generally the fastest but the least accurate. | ||
* ''OpenGL'': This option is generally slower than Direct3D 11, but it often provides more accuracy. | |||
* | * ''Vulkan'': This option is about as accurate as OpenGL while being generally faster. It is sometimes slower than Direct3D11, however. | ||
* ''Software'': This option is intended to provide the most hardware-accurate experience. It can be slower than the hardware renderers, but you can increase the number of rendering threads (should your CPU have enough threads to support it) in order to reduce the performance hit. | |||
* | }} | ||
* | |||
'''Interlacing'''<br /> | |||
This option is the set of deinterlacing techniques GSdx will use to reduce NTSC interlacing effects (screen "shaking" or other [http://en.wikipedia.org/wiki/Interlaced_video artifacts]). '''We recommend leaving this on Auto for all but some picky games.''' | |||
In parentheses, you can see what kind of effect and maybe disadvantage (e.g. like the incorrect FPS readings in blend) each one of these modes have. | |||
{{Tip|You can cycle through the interlacing modes ingame by pressing ''F5''.}} | |||
'''D3D internal resolution (scaling)'''<br /> | |||
This option is only available if Hardware Renderer has been selected above. You can improve the visual quality of your games by increasing the resolution at which the textures are rendered. Please keep in mind that any non-native rendering resolution may cause various glitches in games (from very minor to more serious ones in rare cases). On the other hand for many games (especially for 3D ones) increasing internal resolution will improve the graphics dramatically. Note also that the higher resolution means more work for your video card, thus slowing down rendering process. | |||
*'' | *''Original PS2 Resolution - Native'': GSdx will render only in internal resolution when this option is ON (that is why Custom Resolution and Scaling get grayed out). | ||
*''Custom Resolution'' | *''Scaling'': This option will allow you to choose an arbitrary resolution ('''Custom Resolution'''). Or you can set it to 2x-6x so that the game's internal resolution will be multiplied by that value. For instance setting this option to '''3x''' for a game with native resolution of 640x320 will render all scenes at 1920x960 (triple of the native resolution). Using scaling multiplier instead of custom resolution may prevent some upscaling bugs from manifesting. As of 2015 most graphics cards can easily render at x2 or x3 scaling but may get a sharp speed drop at higher settings. | ||
''' | |||
'''Shaders section'''<br /> | |||
[[image:GSdx_Shade_Boost_Settings.png|thumb|left|Shade boost]] | [[image:GSdx_Shade_Boost_Settings.png|thumb|left|Shade boost]] | ||
*''Enable Shade Boost'': | *''Enable Shade Boost'': This option will help you to adjust saturation, brightness and contrast to your liking. Press ''Settings..'' button to configure. The ''Reset'' button allows you to set the sliders to their initial positions. | ||
*''Enable FXAA'': GSdx will apply the FXAA anti-aliasing algorithm to improve the visual quality of your games with a (usually) minor speed hit. You can also toggle FXAA on and off ingame by pressing ''PageUp''. | |||
*''Enable FXAA'': | |||
*''Enable FX Shader'': Since version 1.2.0, PCSX2 is able to use [[external | *''Enable FX Shader'': Since version 1.2.0, PCSX2 is able to use [[external shaders]] for visual improvements and to add various special effects. By default, PCSX2 comes with 4 simple scanline shaders (which you can cycle through with F7 while ingame). For a huge set of shader effects which include UHQ FXAA, Bilinear FS Filtering, Bicubic FS Filtering, Gaussian FS Filtering, High Quality Blended Bloom, Per-Channel Gamma Correction, Scene Tone Mapping, RGB Colour Correction, S-Curve Contrast Enhancement, Texture, Sharpening, Pixel Vibrance, Post-Complement Colour Grading, Cel Shading, Scanline Emulation, Vignette and Subpixel Dithering you can download Asmodean's shader file [http://forums.pcsx2.net/Thread-Custom-Shaders-for-GSdx?pid=334766#pid334766 from the PCSX2 forums]. <br /> | ||
{{Tip|You can toggle the | Open downloaded zip file and extract ''PCSX2Fx_Settings.txt'' and ''shader.fx'' files in the same directory ''pcsx2.exe'' is located. You can change some shaders' settings by editing the ''PCSX2Fx_Settings.txt'' (the file contains all the needed instructions). External shaders should be used with caution because some of them may potentially have an enormous impact on speed. Note that you can '''use''' external shaders even with GSdx '''software''' renderer, which is the best way to get higher visual quality in this rendering mode. | ||
}} | {{Tip|You can toggle the external shaders on and off by pressing '''Home''' button while ingame.}} | ||
'''Hardware mode Settings''' | |||
This set of options is available only if you have selected Hardware Renderer. Here you can tune some settings for extra performance or video quality. | |||
*''Texture filtering'': | *''Texture filtering'': Enables linear filtering when rendering textures. Blinear (PS2) is the default and the most accurate setting, while Nearest is the least accurate and results in blocky rendering. | ||
*'' | *''Allow 8-bit textures'': Sacrifices texture decoding speed for video card memory (VRAM) requirements. In 8-bit texture mode, the plugin will utilize less memory of your graphics card storing some of the textures in 8-bit format (instead of 32-bit otherwise). This may help with some games that use a lot of 8-bit textures but may become a clog for the others, because these textures will then be decoded by the special shader consuming a portion of the card's processing power. | ||
*'' | *''Alpha Correction (FBA)'': (DX9 mode only) This option will make some of the textures partly transparent (when required) but may sometimes cause some slowness. Should be ON by default. | ||
'''Enabled HW hacks''' | |||
[[image:GSdx2 Hacks Configuration.png|thumb|left|GSdx HW Hacks]] | |||
{{Warning|Only use these settings when you are absolutely sure that they are needed for your game to function.<br /> | |||
These settings can cause serious graphical glitches if used in incorrect games.}} | |||
''' | This checkbox will enable HW hacks that can be configured further using ''Configure'' button. | ||
*''MSAA'': This option is used to activate multisample anti-aliasing mode. It may dramatically improve the quality of visuals but requires some additional processing power from your video card. Additionally it is highly video card memory demanding and may crash PCSX2 if the card runs out of RAM. You can set the option to 2,4,8 or 16. The plugin will automatically choose and use only the supported mode. For more information read the description at the right panel. | |||
*''Skipdraw'': Skips drawing some surfaces based on how likely they are to cause issues. This option may help with removing ghost images or other post-processing effect rendered incorrectly. You should specify how many surfaces need to be skipped after the first problematic one is found. Always try lower values (like 1-3) first before using higher ones. The side effect is the increased possibility for broken/missing graphics and effects. This hack may cause random performance boosts as well. | |||
*''Alpha'': Try this if your game has issues with fog like effects or shadows. | |||
*''MSAA'': | *''Half-pixel Offset'': This hack adds an 0.5 pixel offset to all surfaces so some common up-scaling issues may be fixed. You can try it when blur or halo effects seem to appear shifted to the upper-left corner from where they should be. | ||
*''Skipdraw'': Skips drawing some surfaces | *''Sprite'': Gets rid of black inner lines in 2D sprites. Grayed option is recommended. | ||
*''Alpha'': Try this if your game has issues with fog like effects or shadows | *''WildArmsOffset'': Lowers GS precision to avoid gaps in pixels when upscaling. It's known to help with upscaling problems for some 2D games. Read the description at the right panel for more information. | ||
*''Half-pixel Offset'': This hack adds an offset to all surfaces so | *''Aggressive-CRC'': Can remove effects in some games to make image clearer. Read the description at the right panel for more information. | ||
*''Sprite'': | *''Alpha Stencil'': This setting will disable partial transparency or prevent drawing some elements. May improve drawing shadows. Read the description at the right panel for more information. | ||
*''WildArmsOffset'': | *''Nvidia Hack'': Fixes odd stretching issues in certain NVIDIA drivers when upscaling (using DirectX 11). Try not to use this unless your game Videos or 2D screens are stretching outside the frame. | ||
*''Aggressive-CRC'': Read the description at the right panel | *''Disable CRCs'': The option will disable all the GSdx hacks. This will break many games; but for certain games like [[Shadow of the Colossus]], you might like the result better. | ||
*''Alpha Stencil'': Read the description at the right panel | *''TC Offset X/Y'': These settings can help fixing some misaligned textures when using upscaling. They will correct textures in some games, including [[Shin Megami Tensei: Persona 3|Persona 3]], [[Haunting Ground]] and [[Xenosaga Episode III: Also Sprach Zarathustra|Xenosaga]]. | ||
*''Nvidia Hack'': Try this | |||
*''Disable CRCs'': | |||
*''TC Offset X/Y'': | |||
'''Software | '''Software Mode Settings''' | ||
This set of options will work only if you have selected Software Renderer. You can tune some settings for extra performance or video quality here. The options will not get grayed out even when you select hardware renderer so that you are able to configure both hardware and software mode. Some games may require switching between these modes (F9) so you might need to prepare everything beforehand. | |||
*''Extra Rendering threads'': This | *''Extra Rendering threads'': This option determines how many threads GSdx will use while rendering to take advantage of all the vacant cores your CPU might have (note that it will only be useable for software rendering). For example set it to 3 for quad core processors (1 for PCSX2 and 3 for GSdx software rendering). This may boost speed significantly in multi-core systems. | ||
*''Edge anti-aliasing (AA1)'': This | *''Edge anti-aliasing (AA1)'': This may improve the resulting visuals by applying an anti-aliasing algorithm (required by emulation in some games) but will also reduce performance. This is an experimental option so it must be used with some caution. | ||
'''Movie Capture''' | '''Movie Capture''' | ||
This | This feature will only work while you are ingame. By pressing ''F12'' a message box for video capture will appear. You'll need to specify the place where to store video, processing codec (like for ex. [http://sourceforge.net/projects/x264vfw/ x264vfw], note you'll be only able to use already installed codecs) and picture resolution. Please be aware that lossless or uncompressed video may produce VERY large files so your HDD must have enough free space to contain it. <br/> | ||
Press F12 | Press ''F12'' the second time to stop capturing. The result video will be automatically speed up to 100% even if you have experienced slowdowns while playing. If you use SPU2-X as your audio plugin the audio file ''recording.wav'' will be also recorded and saved alongside with the video file. | ||
You can find some additional information on GSdx plugin [[GSdx|here]]. | |||
===Pad (input) plugins=== | |||
[[image:LilyPad_Settings.png|200px|thumb|right|Lilypad]] | |||
The default PCSX2 1.6.0 installation allows you to select the following PAD plugin: | |||
#LilyPad v0.12.1 | |||
This is arguably the most advanced PAD plugin for PCSX2. Use ''configure'' button to open LilyPad configuration dialog.<br /> | |||
* | You'll see a configuration dialog (pictured, click to enlarge). | ||
*LilyPad supports keyboards, mouse, game pads and XBOX 360 pads. It also has some very handy hacks like ''ESC hack'' or ''Disable Screensaver'' option. | |||
*LilyPad downside is that you '''will''' need to configure the plugin fully at least once before playing any game and it may take quite some time if you are not familiar with it. | |||
* | *For a very detailed description about what each setting does and how to properly configure it visit [[LilyPad]] article and/or the official [http://forums.pcsx2.net/Thread-LilyPad-0-10-0 thread of the plugin]. | ||
*'' | ===Sound plugins=== | ||
[[image:SPU2-X_Settings.png|200px|thumb|right|SPU2-X]] | |||
SPU2-X is the most advanced, compatible and up-to-date sound plugin for PCSX2. It was first based on '''Gigaherz's''' SPU2ghz and later modified by '''Jake Stine (Air)'''. This is the only SPU2 plugin that supports audio processing effects (like reverberation and Dolby Pro Logic (if your sound card is able to decode it)). Many games only work correctly with SPU2-X. | |||
*''Interpolation'': Specifies the interpolation algorithm (smoothing low frequency sounds not unlike anti-aliasing algorithms for graphics): | |||
:#''Nearest'': This option will disable sound interpolation. It is the fastest option but the sound may not be that good in quality. | |||
:#''Linear'': SPU2-X will use linear interpolation. This method is fast and the quality is acceptable. | |||
:#''Cubic'': SPU2-X will use cubic interpolation (slower and better in quality). | |||
:#''Hermite'': SPU2-X will use Hermite interpolation (slower and better in quality). | |||
:#''Catmull-Rom'': SPU2-X will use cubic Hermite (a.k.a Catmull-Rom) interpolation (slower and better in quality). | |||
*'' | *''Disable effects processing'': This option will disable any special effects requested by games (like for example reverberation), This may speed up the emulation but some games may not sound as good as they should be. | ||
*'' | *''Use the de-alias filter'': Gives more emphasis to the highs. | ||
{{Clear new paragraph}} | |||
*'''Module''': This option allows you to select the method (API or back-end module) of playing the sound. Normally it should not alter sound quality or speed: | |||
#''No sound'': SPU2-X will not produce any sound. The fastest option suitable mostly for debugging. | |||
#''XAudio 2'': Recommended for Windows users. | |||
#''DirectSound'': Recommended for Windows users if ''XAudio 2'' option does not work. | |||
#''WaveOut'': Not recommended, but may be an alternative if nothing else works. | |||
#''Portaudio'': SPU2-X will use a cross-platform library called Portaudio. This is the only option for Linux users.<br/> | |||
''Portaudio'' settings: | |||
*''Host API'': This is the API Portaudio will use to produce sound, if Windows WASAPI has issues, try setting this to Windows DirectSound | |||
*''Device name'': the option is used to select the specific audio device you want to output sound to. | |||
*''WASAPI Exclusive mode'': This will allow SPU2-X to work in exclusive mode, blocking all other applications from using your output device. | |||
*''Output Latency'': The lower the latency value the smaller audio delay you will experience. You can leave this to ''Use smallest possible'' to let the plugin decide what's best for you, or set a custom value below. Note that setting latency too low '''WILL''' cause clicks and pops in sound, so change the values until you find the lowest one that works with your game without causing issues. | |||
*'' | [[image:SPU2-X_Advanced_Settings.png|200px|thumb|left|SPU2-X Advanced settings]] | ||
*'''Synchronizing mode''' | |||
#''TimeStretch'': The default and recommended setting. The options will keep audio and video in sync and it may also help to eliminate clicks and other sound problems. Note that if you cannot achieve 100% speed in game, the sound will also slow down to match your emulation pace. | |||
#''Async Mix'': This option will let the audio samples play on their own making it possible for the audio to go out of sync with the video if your emulation is slow enough. You will hear normal sound even if your frame rate is not optimal. '''This option can cause hangs or crashes in some games so use with caution!''' | |||
#''None'': SPU2-X will skip the sample whenever the emulation will start lagging behind. This may break the sound experience on slow machines but you may gain a small speed boost. | |||
*''Advanced'': These options are only useful in ''TimeStretch'' mode and let you configure some of its parameters. Fine tuning stretching behavior may improve a perceived sound quality. Try to increase the values in case your speed is not optimal and decrease the values in case you're playing with speed higher than normal. Pressing ''Reset to Defaults'' will set all values back to their initial numbers. | |||
{{Clear new paragraph}} | |||
'''Audio Expansion Mode''': This option will help you to expand the ingame sound to your specific speakers or headphones configuration. This option is only supported in ''XAudio 2'' mode (see module). | |||
#''Stereo'': Default setting. Stereo sound. | |||
#''Quadrafonic'': Will expand audio to 4 speakers | |||
#''Surround 5.1'': Will expand audio to 5.1 surround speakers | |||
#''Surround 7.1'': Will expand audio to 7.1 surround speakers | |||
*''Use a Winamp DSP plugin'': This option will allow you to use ''Winamp'' DPS plugins to alter the resulting sound. It will require you to set plugin's path in ini-file (see '''[DSP PLUGIN]''' section in ''SPU2-X.ini'' file in ''inis'' sub-folder of your PCSX2 folder). | |||
*'' | *''Enable debug options'': This option is only useful for developers (it will allow for extensive logging and dumps). | ||
===CDVD plugins=== | |||
[[image:Cdvd_Gigaherz_Settings.png|right|thumb|Gigaherz's CDVD]] | |||
''' | In most cases you will only need to use the PCSX2 built-in ''ISO loader'' ('''ISO''' option in the ''CDVD'' menu, then use '''ISO Selector''' to select actual game image from the ''image history list'' or choose ''Browse...'' to select the image from disk.<br /> | ||
However, if you want to play a game from the actual DVD disk or to create a dump of an ISO file, use the '''Plugin''' option in the ''CDVD'' menu. It will let you use one of the PCSX2 CDVD plugins instead of ''ISO loader''.<br /> | |||
The default PCSX2 1.6.0 installation has one CDVD plugin: | |||
#Gigaherz's CDVD v0.11.0 | |||
*Configuration allows you to select your DVD-ROM drive letter. This option will allow you to play directly from your PS2 DVD without dumping it to an ISO image. Put your PS2 DVD disk in the selected drive before starting emulation. | |||
* | |||
===Dev9 (HDD and ethernet) plugins=== | |||
Dev9 is a collective name for plugins that handle '''HDD''' and '''ethernet''' (LAN/Internet) access. | |||
By default PCSX2 installation has only one plugin ''Dev9null v0.5.0'', which is null plugin used as a stub. However there is a newer Dev9 plugin in development by '''Luigi__''' named ''MegaDev9''. The plugin is still in its early development stage at this time (early 2015) but it can already partially emulate '''HDD'''. You can get it from [http://pcsx2.net/download/viewcategory/9-plugins.html here].<br /> | |||
Also there is an experimental Ethernet plugin from '''gigaherz''' and '''drkIIRaziel''' named ''DEV9giga-razi''. Even with the most of Sony game servers down you can still give it a try. It can be downloaded using this [http://pcsx2.net/download/viewcategory/9-plugins.html link]. | |||
{{Tip|Make sure you follow the ''[http://forums.pcsx2.net/Thread-How-To-Play-Online-Guide how to play online]'' guide.}} | |||
===USB emulation plugins=== | |||
As with Dev9 plugins PCSX2 does not currently have any official working plugin to properly emulate USB access. The release package includes only ''USB Null v0.7.0'' which is yet another stub plugin. However | |||
there is a USB plugin called ''Nuvee'' that supports USB mice, keyboards and lightguns by '''[http://forums.pcsx2.net/User-shalma Shalma]'''. You can get it from [http://pcsx2.net/download/viewcategory/9-plugins.html here].<br /> | |||
Additionally, there is a new plugin by '''[http://forums.pcsx2.net/User-jackun jackun]''' called ''USBqemu wheel mod'' emulating steering wheels. The plugin is a modification of an old USB ''Qemu'' plugin. USBqemu is fully capable of supporting various steering wheels. For more information visit the plugin's [http://forums.pcsx2.net/Thread-Qemu-USB-Wheel-Storage-mod dedicated thread] on the forums and/or you can download it using [http://pcsx2.net/download/viewcategory/9-plugins.html this link]. | |||
===Firewire emulation plugins=== | |||
At this moment, there are no official or unofficial working Firewire plugins for PCSX2. The included plugin ''FWnull v0.7.0'' is a stub akin to Dev9 and USB plugin stubs. | |||
==BIOS== | |||
Obtaining PS2 games can be as easy as buying PS2 DVDs off eBay. However, an original game DVD is not enough to make PCSX2 work. You'll also need the BIOS dumped from your PS2. Unlike the PS2 PCSX2 does not implement region locking so if you have a PAL BIOS in your PS2 you can still play NTSC games, and vice versa. | |||
[[image:Bios_with_Bios.png|thumb|left]] | |||
The ''BIOS'' tab of the Plugin/BIOS selector window will allow you to select a BIOS image from the list of BIOSes available to you or to specify the folder where these images are stored.<br /> | |||
{{Warning|Note that the only '''legal''' way of obtaining a BIOS image is to dump it from '''your own''' PlayStation®2 console. Do '''not''' attempt to ask where to get BIOS images on the PCSX2 forums, because it's against the [http://forums.pcsx2.net/Announcement-Global-Forum-Rules forum rules]. The PS2 BIOS is copyrighted material of [[Sony|Sony Corporation]]. It is illegal to distribute the copyrighted files without copyright holder consent. PCSX2 team could get in trouble if suspected of illegally supplying people with BIOS files!}} | |||
If your BIOS image does not appear in the BIOS images list and you are sure that you have selected the correct folder, you may what to try dumping your BIOS again because the one you have is probably not valid or corrupted.<br /> | |||
Note that it is not recommended to use the first Japan version of BIOS (''SCPH-10000.bin''). You will probably be able to run the games with it but there is a chance to affect compatibility somehow. Although the first PS2 consoles should be really hard to get these days. | |||
{{tip|Interesting fact: For maximum compatibility it is recommended that you use a BIOS image '''different''' than SCPH10000.BIN which is the oldest one. That's because with this BIOS there are problems in memory card emulation and in other sections. '''auMatt'''.}} | |||
The dumping of BIOS is a complicated process so follow the instructions you can get [http://forums.pcsx2.net/Thread-Official-English-PCSX2-configuration-guide-v0-9-8#Bios from this thread]. You can start dumping by downloading the tool from [http://pcsx2.net/download/releases/tools.html this page] or refer to the official guide [http://forums.pcsx2.net/Thread-Guide-to-Dumping-Your-PS2-Bios-over-LAN here]. Also, [http://www.youtube.com/watch?v=n3AVqzYcqSw here] is a YouTube tutorial on dumping your BIOS (by '''FullGrownGaming'''). | |||
Apart from the main BIOS file (''SCPH-XXXX.bin'' must be exactly 4Mb of size) your BIOS files collection may include ''rom1.bin'',''rom2.bin'',''erom.bin'' and ''SCPH-XXXXX.nvm'' files (note that ''XXXXX'' is the version of your BIOS, e.g. ''SCPH-34004.nvm'' and ''SCPH-34004.bin''). The last file contains some PS2 common and regional settings and it can also be created by the PCSX2 itself after you configure your BIOS while in emulation mode (set time zone, language, etc.) but it would still be fine to dump this file directly from your console. | |||
{{tip|Interesting Fact 2: The first Japanese PS2 had a single BIOS and the DVD player was installed on the MemCard. The PS2 consoles following the first model had the DVD Player software installed in a separate ROM (EROM) which is encrypted. The ROM1 is an additional part of the BIOS that contains excess info and items, such as IDs for the DVD Player version. ROM2 is quite similiar, but (potentially) exclusive to Chinese PS2s. '''auMatt'''.}} | |||
==Folders== | |||
[[image:Folder_selector.png|400px|caption|left]] | |||
This page will allow you to select different folders to store [[Savestate|savestates]], snapshots or system logs. Uncheck the ''Use default setting'' checkbox to be able to choose the required folder. | |||
{{Clear new paragraph}} | |||
== | ==Emulation Settings (Core configuration)== | ||
''Emulation Settings'' config window is the collection of main PCSX2 settings to tune the behavior of PCSX2 itself (not unlike the plugins separate configurations can tune the behavior of a particular plugin). You can access the window from ''Config'' => ''Emulation settings'' menu. There are 6 tabs, ''EE/IOP'', ''VUs'', ''GS'', ''GS Window'', ''Speedhacks'' and ''Gamefixes'' each of which has its own set of settings. | |||
===EE/IOP=== | |||
[[file:EE-IOP.png|300px|thumb|right]] | |||
EE/IOP tab stands for ''Emotion Engine / Input Output Processor'' which are the core components of the PlayStation®2. The tab contains 4 settings. | |||
*''Emotion Engine'': Enables or disables ''recompiler'' (i.e. the program that translates the native PS2 code into the native x86 code, instead of slowly interpret each PS2 command) for PS2 ''Emotion Engine'' (EE) processor emulation. ''Interpreter'' mode disables the recompiler making the emulation painfully slow. ''Recompiler'' mode is extremely compatible, so the ''interpreter'' mode shouldn't be used for anything but debugging purposes. | |||
**''Enable EE Cache'': Used only with ''interpreter'' mode, and only known to help the Japanese version of ''[[Dead or Alive 2]]''. | |||
[[ | *''IOP'': Enables or disables ''recompiler'' for PS2 ''Input Output processor'' (IOP). You should also leave this option enabled. | ||
*''Round mode'': Changes the rounding method for float numbers. Intel/AMD x86 CPUs and PS2 CPUs use somewhat different floating numbers implementations. Recompiled program running in the native x86 code may sometimes calculate slightly different numbers. As insignificant as it may sound this difference can really break games to the point of crashing and black screens. Unfortunately there is no real way to fully implement PS2 CPUs behavior when it comes to floating point arithmetic so PCSX2 will allow you to use a collection of different approximations known to work better for some games while breaking the others. If your game is freezing, try changing this value. Default and the most compatible setting is ''Chop/Zero''. This default value will be changed automatically for some games known to need a different value when ''Automatic Gamefixes'' mode is enabled (see ''System'' main menu). | |||
*''Clamping mode'': Changes the implementation of emulation of ''INF'' and ''NaN'' numbers. Same as with rounding FP numbers the implementations of INF (infinity) and NaN (not a number -- reserved byte combinations could not be translated in any real FP number) in PS2 CPUs are different from x86 CPUs. And same as with FP numbers this obstacle cannot be gracefully overcome. This setting will allow you to choose one of four approximations of PS2 CPUs INF/NaN behavior, each of which is more compatible than the previous one in the cost of emulation speed (being more compatible in this case will require additional checks and code tricks each time FP number is calculated). These modes go from '''faster''' to '''slower'''. ''None'' is the fastest but the least compatible mode and ''Full'' is the slowest but the most compatible mode. By default the value is ''Normal'' which will work fine for most games without compromising the speed much. This default value will be changed automatically for games known to need a different value when ''Automatic Gamefixes'' mode is enabled (see ''System'' main menu). | |||
* | *''Restore Defaults'': This button will restore all settings to their default values (which are seen as in bold or green font). | ||
{{Clear new paragraph}} | |||
===VUs=== | |||
=== | [[image:VUs.png|300px|thumb|right]] | ||
VUs stand for ''Vector Unit''s which are the PlayStation®2 co-processors working in parallel with the EE and IOP CPUs. The PlayStation®2 has two VUs called ''VU0'' and ''VU1''. | |||
[[image: | |||
* You can change VUs compilation modes independently for VU0 and VU1 (although it makes sense to set them to the same value). As with ''EE'' and ''IOP'' CPUs there is an old and very slow ''interpreter'' mode which is useful only for debugging. VUs however have two different ''recomplilers'' -- ''microVU'' (more compatible default recompiler) and ''superVU'' (legacy less compatible recompiler used mainly for debugging, but it can be slightly faster). It is recommended to leave both settings at their default ''microVU Recompiler'' value. | |||
* ''VU0/VU1 Advanced recompiler options'' let you select ''Round mode'' and ''Clamping mode'' for floating point numbers emulation much like with ''EE'' and ''IOP'' CPUs modes (see [[#EE/IOP|above]]). | |||
* | |||
* ''Restore Defaults'' button will restore all settings to their default values (which are seen in bold or green font). | |||
{{Tip|If you experience spikey polygons (SPS) or bad geometry, try setting ''Clamping mode'' to '''Extra + Preserve Sign'''.}} | |||
{{Clear new paragraph}} | |||
[[image: | ===GS=== | ||
[[image:GS.png|300px||thumb|right]] | |||
GS stands for ''Graphics Synthesizer'' PlayStation®2 co-processor responsible for rendering the graphics (but is also used by some games for additional calculations and other purposes). The PCSX2 will work in conjunction with the selected GS plugin (like for ex. [[#GSdx|GSdx]] plugin) to emulate PS2 graphical co-processor and convert its output into input understood by the PC video cards. | |||
*''Framelimiter'': The options in this group can be used to control the frame rate of your games in various ways. | |||
|''' | #''Disable Framelimiting'': With this option enabled the frame rate will only be limited by the power of your PC. It will '''not''' however increase the game performance in case the game runs slow. This option may be useful when you want to skip some repetitious sections of the game. You can toggle it while playing by pressing ''F4''. | ||
#''Base Framerate Adjust'': This option will allow you to adjust the base framerate for your games by a percentage. The emulator will limit the game frame rate by the base NTSC (59.94 FPS) or PAL (50 FPS) constants. Frame rate will be increased or decreased according to this value. Again, this option will not speed up the slow game it may only limit the frame rate of a game performing faster than needed on your PC. | |||
#''Slow Motion Adjust'' and ''Turbo Adjust'': PCSX2 has two additional frame rate modes that you can freely switch to while playing a game. ''Slow Motion'' mode can be switched (on and off) by using ''Shift-Tab'' and ''Turbo'' mode be switched by just using ''Tab'' key. | |||
{{Tip|Pressing '''Tab''' while playing a game will increase a frame rate to a certain point (if your PC allows it); '''F4''' will disable frame limiter completely. You can also use '''Shift + Tab''' to slow game game down. Pressing the key combination the second time will restore the original frame rate}} | |||
#''NTSC Framerate'' and ''PAL Framerate'': These boxes indicate the base frame rate to limit the speed of NTSC or PAL games. The default values are 59.94 FPS and 50 FPS respectively. These values can be changed only by editing the ''pcsx2_vm.ini'' (in ''inis'' folder of PCSX2, see ''FramerateNTSC'' and ''FrameratePAL'' variables). It is not recommended to change them because it will break a number of games (but note that decreasing the values can speed up a few games). | |||
*''Frame Skipping'': Frame skipping is a technique which tells the emulator to refrain from drawing some frames making it possible to increase the perceived game performance when the normal game speed can't be achieved by other means. PS2 internal design (the way GS processor's output and communications are implemented) does not allow for the precise frame skipping. Although this feature may help some slow games to work smoother, it will inevitably cause stuttering, flashing or other abnormal behavior in other games, so use it with cation and do not forget to disable it when you're about to switch to another game. Frame skipping can be toggled while ingame by pressing ''Shift + F4''. The following frame skipping modes are available: | |||
#''Disabled'': This option will have frame skipping disabled (you can still enable it by the mentioned ''Shift + F4'' combination) | |||
#''Skip when on Turbo only'': This option will enable the feature automatically in ''Turbo'' mode (see above, use ''Tab'' to toggle the turbo mode while ingame) | |||
#''Constant Skipping'': This allows the frame skipping to be enabled by default. | |||
#''Frames to Draw'' and ''Frames to Skip'': These boxes allow to adjust the frame skipping mechanism to your liking. You can specify how many frames will be drawn before skipping (''Frames to Draw'') and how many frames will be skipped prior to start drawing again (''Frames to Skip''). Default values are ''2'' and ''2''. | |||
{{Tip|To enable frame skipping while playing press '''Shift + F4'''. Press this combination again to disable it.}} | |||
*''Use Synchronized MTGS'': This will enable a different MTGS mode. The mode is very slow and useful for debugging purposes only. | |||
''' | |||
{{Clear new paragraph}} | |||
= | ===GS Window=== | ||
[[image: | [[image:GSWindow.png|300px|thumb|right]] | ||
This tab will allow you to control the PCSX2 GUI game window (video output window) behavior: | |||
*''Aspect Ratio'': You can select the window aspect ratio (shape) here. If you have a widescreen (16:9) monitor you may want to remove the left and right black bars to get a better experience. Unfortunately many games do not natively support wide screen aspect ratio and selecting it here will cause the image to stretch which may not be a desirable side effect. Some games however may be helped to support 16:9 resolution by special ''widescreen patches'' made by the community. If the game neither have the native 16:9 support nor the patch to overcome this your only options are to play it with 4:3 aspect ratio with black bars or bear with image stretching whichever option is the best for you. You can choose ''Standard (4:3)'', ''Widescreen (16:9)'' or ''Fit to Window/Screen'' here. In the latter case image will always be stretched. | |||
{{Tip| | |||
*If you have downloaded widescreen patch (a file with ''pnach'' extension) you should place it into '''cheats_ws''' folder of your PCSX2. This way you will be able to enable cheats and widescreen patches (essentially cheats as well) separately for any game. To enable patches from '''cheats_ws''' folder select ''Enabled Widescreen Patches'' item in ''System'' sub-menu of PCSX2 main menu | |||
*For more information regarding widescreen patches, please check [http://forums.pcsx2.net/Thread-PCSX2-Widescreen-Game-Patches ''Widescreen Game Patches''] this forum post }} | |||
[ | |||
*''Custom window size'': This option lets your define the GS window size in pixels. Note that this does not affect the game's rendered resolution, image quality or speed in any way. Your game sessions will always start with the window size you have selected here. | |||
*''Zoom'': This option will zoom in or out the rendering image (around the central point). It may help in certain situations (decrease black bars for instance by zooming them out of the view). You can also use this feature while in game by pressing ''Ctrl'' and '' numpad +'' to zoom in, ''Ctrl'' and ''numpad -'' to zoom out and ''Ctrl'' and ''numpad <nowiki>*</nowiki>'' to reset zoom too 100%. | |||
{{Tip|There is also a hidden key combination to stretch GS window while in game only vertically. Use ''Ctrl'' + ''Alt'' and ''numpad +'', ''numpad -'' and ''numpad *'' to increase, decrease or reset vertical stretch. This option may be useful when you need to remove vertical top and bottom black bars but remember that the image itself will get stretched and will lose original proportions.}} | |||
*'' | |||
*''Disable window resize border'': This option will remove the black bars used as resizing padding from the GS window. | |||
*''Always hide mouse cursor'': This option will disable drawing the mouse cursor anywhere within GS window. This may be helpful if the mouse is used for aiming in game. | |||
*''Hide window when paused'': With this option enabled, the GS window will be hidden whenever emulation is paused. | |||
*''Default to fullscreen mode on open'': This will instruct PCSX2 to start emulation in ''fullscreen'' mode. Switch back to ''windowed'' mode by pressing ''Alt'' + ''Enter''. | |||
*''Double-click toggles fullscreen mode'': Enables to use ''double-click'' to switch between ''fullscreen'' and ''windowed'' modes (along with ''Alt'' + ''Enter'') | |||
*''Wait for vsync on refresh'': When checked, PCSX2 will use [http://en.wikipedia.org/wiki/Analog_television#Vertical_synchronization ''vertical synchronization''] when drawing frames. ''Vsync'' can reduce image tearing but will also greatly reduce actual FPS. This option will only apply to ''fullscreen'' mode and may not work with all GS plugins. | |||
{{Clear new paragraph}} | |||
===Speed Hacks=== | |||
[[image:Speedhacks.png|300px|thumb|right]] | |||
Speed hacks are various techniques used to speed up emulation at the cost of emulating accuracy. All of these options '''can cause severe bugs, crashes and other abnormal behavior''' so use them with caution! Some games may benefit from these settings immensely while others can be slowed down or broken. Read the on-screen hints and messages to get more information (especially if you're new to this) they will help you not to break anything.<br /> | |||
If your system is '''powerful enough''' to emulate your game in full speed '''you do not need to enable anything here''' because none of these options can improve compatibility. | |||
*'' | {{SpoilerTable|caption=Expand Speed Hacks|text=Speed Hacks | ||
#'' | *''Enable speedhacks'': You can disable all speed hacks in one click by unchecking this box. This may be useful if your game is unstable and you are narrowing down the possible cause of this. | ||
#'' | *''Emotion Engine (EE) Cyclerate'': This hack will increase the time required for one EE operation to complete (essentially down-clocking ''[[#EE/IOP|Emotion Engine]]''). Your CPU will get additional cycles to spend on emulation of other PS2 processors. This will speed up those game that do not utilize EE processor fully (VUs and GS will get additional CPU power). In contrast, the games that use EE fully will appear slowed and may start skipping frames. | ||
#'' | #''Slider Level 1'' (default): This will emulate the ''EE'' on its actual speed. | ||
#''Slider Level 2'': Reduces the EE cycle rate by 33%. Moderate speed increase for many games and small compatibility hit. | |||
#''Slider Level 3'': Reduces the EE cycle rate by 50%. Big speed increase for some games and moderate compatibility hit. '''This setting can also cause stuttering audio in game videos'''. | |||
''' | *''VU Cycle Stealing'': This hack specifies the number of cycles the ''[[#VUs|Vector Units]]'' steal from the ''[[#EE/IOP|Emotion Engine]]''. This option is somewhat resembling the previous although the donated CPU power will go directly to two VUs (not ''[[#GS|GS]]'' emulation or other PCSX2 needs). As ''VUs'' tend to need more power than ''EE'', the hack will exploit this fact by overclocking VUs in the cost of EE clock speed reduction. Please note that it can cause false FPS readings (especially in higher values), screen flashing, slowdowns and possibly more serious bugs for some games! Using the slider control you can select up to four levels of VU stealing starting with level 0 (no VU stealing) to level 3 (severely incompatible option that will cause flickering, slowdowns and graphical bugs for the majority of games). Level 1 is fairly compatible while level 2 is selectively compatible and should be used with a caution. | ||
*''Other Hacks'' | |||
**''Enable INTC Spin detection'': This hack exploits the vsync technique used by some (mostly 2D) games. Vsync signal will be set immediately skipping the games' waiting cycle. The hack is set by default and is very compatible. | |||
**''Enable Wait Loop detection'': PCSX2 will detect some idle cycles with this hack enabled. Some games used those cycles for various reasons (from synchronization or to slowing down if the real PS2 speed was too high). If detected a cycle than will execute only once reducing the waiting time and moderately increasing emulation speed of some games. The hack is set by default and is very compatible. | |||
**''Enable fast CDVD'': Reduces loading times by setting a faster disc access mode. Check the '''HDLoader''' [http://pcsx2.net/compatibility-list.html compatibility list] for games that will '''NOT''' work with this (usually marked as needing mode 1 or slow DVD). Not recommended since it can break many games. | |||
*''microVU Hacks'': These hacks are only applied when microVU is selected as the VUs recompiler. If superVU is selected, these hacks do not apply. | |||
**''mVU Flag Hack'': This hack will skip some VUs flag updates by detecting the program blocks that will not read VUs flags, saving CPU time. SuperVU recompiler is said to have this hack built-in by default. The hack is set by default and is very compatible (but still may cause bad graphics in case the detection algorithm fails). | |||
**''MTVU (Multi-Threaded microVU1)'': This option will isolate [[#VUs|VU1]] emulation to a separate CPU thread, making it a huge speed up for CPUs with 3 or more cores. The option is highly compatible (except for some possible synchronization errors or timing issues that may cause problems in a handful of games). If you have a dual-core CPU you may still want to try this option (there are some reports of speed increase even on these CPUs). | |||
*''Restore defaults'': Click this to restore all settings to their default values. | |||
}} | |||
{{Clear new paragraph}} | |||
===Game fixes=== | |||
[[image:GameFixes.png|300px|thumb|right]] | |||
This tab contains some game-specific hacks and fixes. These fixes are disabled by default but enabled automatically if the game in question is detected to be running. The ''Automatic Gamefixes'' option can be also switched off (although it is not recommended) in ''System'' sub-menu of PCSX2 main menu. You should not enable these hacks unless you have a game that somehow was not detected by PCSX2 automatically (note also that some of these fixes are not applied automatically). | |||
The game-specific fixes are temporal solutions to some unresolved emulation issues. PCSX2 developers provided them to increase compatibility levels so some games, otherwise broken, can still be enjoyed. As the emulation compatibility will continue to improve some of these options may become obsolete and will be removed. | |||
Most of these hacks are needed because the PS2 has different float arithmetic than x86 CPUs. Some of these differences do not lead to any problems, others however may cause serious issues in certain games. You can read hacks descriptions and hints to get more information. | |||
*'' | {{SpoilerTable|caption=Expand Fixes List|text=Fixes List | ||
* ''VU Add hack'': Enable it only for [[Star Ocean: Till the End of Time]],[[Valkyrie Profile 2: Silmeria]] and [[Radiata Stories]]. | |||
* ''VU Clip Flag Hack'': This hack is only needed when ''superVU'' is selected as [[#VUs|VUs]] recompiler. Needed for [[Template:Megami_Tensei_series|Persona]] games. | |||
* ''FPU Compare Hack'': Enable it only for [[Digimon Rumble Arena 2]]. | |||
*'' | * ''FPU Multiply Hack'': Needed only for [[Tales of Destiny]]. | ||
*'' | * ''FPU Negative Div Hack'': Needed for [[Mobile Suit Gundam: Encounters in Space|Gundam]] games, fixes the camera view. | ||
* ''VU XGkick Hack'': Adds more delay to ''VU XGkick'' instructions. Needed for [[Elemental Gerad: Matoe, Suifu no Ken|Elemental Gerad]]. | |||
* ''FFX videos fix'': Fixes gray overlay garbage in the videos of [[Final Fantasy X]]. | |||
*'' | * ''EE timing Hack'': Known to help [[Shin Megami Tensei: Digital Devil Saga|Digital Devil Saga]], [[SSX]], [[Resident Evil: Dead Aim]]. | ||
* ''Skip MPEG Hack'': Use this to skip freezing intro videos to avoid hanging. | |||
* ''OPH flag Hack'': Needed for [[Bleach: Blade Battlers]], Growlancers [[Growlanser II: The Sense of Justice|II]] and [[Growlanser III: The Dual Darkness|III]] and [[Wizardry: Tale of the Forsaken Land|Wizardry]]. | |||
*'' | * ''Ignore DMAC writes when it's busy'': Needed for [[Mana Khemia: Alchemists of Al-Revis]] and [[Metal Saga]]. | ||
*'' | * ''Simulate VIF1 FIF read ahead'': Can help games which load slow (for ex. [[Test Drive Unlimited]] or [[Transformers]]) | ||
*'' | *''Delay VIF1 stalls (VIF1 FIFO)'': Fixes [[SOCOM II: U.S. Navy SEALs]] HUD. | ||
*'' | * ''Enable the GIF FIFO'': Needed for Hotwheels, Wallace and Grommit, and DJ Hero. | ||
* ''Switch to GSdx software rendering when an FMV plays'': This will allow [[GSdx]] to automatically switch to a software renderer when FMV starts to play and back to hardware renderer when the video is finished. This option is very useful considering the number of games that have issues with videos in GSdx hardware mode. | |||
*'' | * ''Preload TLB hack to avoid TLB miss on Goemon'': Helps to fix [[Bouken Jidai Katsugeki Goemon]] TLB miss issue. | ||
*'' | * ''VU I bit Hack avoid constant recompilation (Scarface: The World is Yours)'' | ||
* ''VU I bit Hack avoid constant recompilation (Crash Tag Team Racing)'' | |||
}} | |||
{{Clear new paragraph}} | |||
==Presets== | |||
For those users do not want to spend the time fiddling with all the hacks, fixes and speed-ups described above and especially for the new users who wants to start playing games right away the system of options sets or ''presets'' was introduced. This system will restrict you to only 6 slider positions instead of myriad options and PCSX2 will automatically assume using specific options, game fixes and speed-ups according to the ''presets'' level you choose. Check ''Preset'' checkbox on the botton of settings window to enable using presets. This will disable most of the options on many tabs (because they will now be controlled by PCSX2 automatically). Presets go from the safest (but also the slowest) to the most unsafe (but the fastest one). You should start with level '''1''' or '''2''' if you have a powerful machine. Level '''3''' and '''4''' are for those who do not have a good machine or have a very demanding game to emulate. Level '''5''' or '''6''' are not recommended and should only be used as a last resort (some game can even be ''slowed down'' by those levels). | |||
In 1.7, presets 4–6 have been removed. | |||
=PCSX2 main menu= | |||
The PCSX2 1.6.0 main menu consists of six sub-menus, called ''System'', ''CDVD'', ''Config'', ''Misc'', ''Debug'', and ''Capture''. The 1.7.0 main menu is mostly the same, except that ''Misc'' is absent and that it now contains a ''Help'' sub-menu. | |||
*'''System menu''' contains system-wide switches and options. | |||
**''Boot CDVD (full)'': This item will allow you to load and start your game from the source configured in your chosen [[#CDVD plugins|CDVD plugin]]. If you did not configure any CDVD plugin the emulator will start the previously used ISO image or will ask you to select one if this is the first time you use ISO loader. This particular option will load BIOS first which in turn will load the game itself. Loading BIOS will take time but some games may use language configured in BIOS thus allowing you to play in your language (ex. [[Jak 3]]). Some game may need BIOS to initialize internal variables, and may refuse to start otherwise ([[Amplitude]] or [[Lara Croft Tomb Raider: The Angel of Darkness]]). Most of the games however does not necessarily need to be started from BIOS in order to function properly. And there are games that will refuse to start correctly through BIOS (ex. [[Burnout Dominator]]). | |||
**''Boot CDVD (fast)'': This item will not load BIOS before starting your game. It is safe to choose this option for the majority of games. | |||
**''Run ELF...'': This item will let you load a single executable ELF-file. Most PS2 home-brew demos are in ELF-format. However the mode is not suitable to run commercial games. | |||
**''Pause/Resume'': This item will be enabled until you start a game. You can pause and resume the game any time during your game session. | |||
**''Load State'': This item will allow you to select and load a [[Savestate|savestate]] from one of the 10 save slots. Additionally there is a backup state which will contain the last overwritten savestate (so you have a last chance to restore your save when you accidentally overwrite it or the written state appeared to be corrupted). This item will only be active when you're ingame. | |||
**''Save State'': You can save a game state in one of the 10 save slots. This item will only be active when you're ingame. | |||
**''Backup before save'': Unchecking this option will disable the backup savestate (see ''Load State'' description). | |||
**''Automatic Gamefixes'': This item will enable or disable automatic application of game fixes. See ''[[#Game fixes|game fixes]]'' for more info. | |||
**''Enable Cheats'': This item will enable or disable automatic application of game cheats. Cheats are ''pnach'' files located in PCSX2 ''cheats'' folder. These files have multiple purposes from making your game playable (if nothing else helps) to circumventing some in game restrictions (adding more money or making your ingame character immortal, see [[Game cheats|game cheats]] and [[Memory editing|memory editing]] for further information). You can find the big library of cheats on the forums [http://forums.pcsx2.net/Thread-Post-your-PCSX2-patches-here in this thread]. | |||
**''Enable Widescreen patches'': This item will enable the additional folder ''cheats_ws'' to load ''pnach'' files from. You should use it to store widescreen patches for your games. See some information about it [[#GS Window|here]]. You can find the big library of patches on the forums [http://forums.pcsx2.net/Thread-PCSX2-Widescreen-Game-Patches in this thread]. | |||
**''Enable Host Filesystem'': This item will enable or disable the file system extension that may be used by home-brew developers to load files from your (host) machine. See some [http://code.google.com/p/pcsx2/issues/detail?id=1238 more information] (or [http://web.archive.org/web/20150510060815/http://code.google.com/p/pcsx2/issues/detail?id=1238 alternatively]) if you're interested. | |||
**''Shutdown'': This item will shut down the current game you are playing and reset PCSX2 (it will not close PCSX2 itself). | |||
**''Exit'': This item will close the emulator. | |||
[[ | *'''CDVD menu''' contains options for PCSX2 internal ISO loader. | ||
**''ISO Selector'': This item will allow you to select one of the recent ISO images or add new ISO image to the list by using ''browse..'' item. The image you selected here can be booted in ''system menu'' (see description above). | |||
**''Plugin Menu'': This item will let you quickly choose [[#CDVD plugins|CDVD plugin]] and access its configuration (rather than going through plugins configuration). The menu will only be accessible if you choose ''Plugin'' item in ''CDVD menu'' menu (i.e. if you prefer to boot your game using plugins instead of internal ISO loader). | |||
**''ISO'', ''Plugin'' and ''No Disc'' items: You can only select one of the three options. Choose ''ISO'' if you want an internal ISO loader to boot your ISO image (you cannot play off the real DVD disk this way), choose ''Plugin'' if you prefer to use a plugin for this task (remember that plugin needs to be configured before use, see [[#CDVD plugins|CDVD plugin]]). ''No Disc'' option will allow you to run only BIOS (as if you started PS2 console without inserting any DVD). You can configure your language in BIOS options before playing some games that may use BIOS to determine your language preferences. | |||
*'''Config menu''' will allow you to access plugins' configurations and core emulation settings (all of these options were described above) | |||
**''Emulation Settings'': Please refer to [[#Emulation Settings (Core configuration)|Emulation Settings]]. [[image:MemcardManager.png|300px|thumb|right|The Memory Card manager]] | |||
**''Memory cards'': Will open the [[Memcard|memcard]] manager able to manipulate your virtual memcards: | |||
***You can specify a custom folder for memory cards using ''browse'' button. | |||
***''Open in Explorer'' will open the selected folder in Windows Explorer (to access its contents). | |||
***Selecting a memcard from the list will allow you to ''Duplicate'', ''Rename'' or ''Delete'' it. | |||
***''Eject'' button is available when you select one of the two ''active'' memcards. ''Ejecting'' memcard will not delete its contents it will only make the card inactive disallow PS2 games to use it in any way. To ''insert'' card in one of two available virtual card slots, select a disabled card, press ''Insert'' button and choose a virtual port to insert your card to (any memcard already in this port will be automatically ''ejected'' and disabled). | |||
***To ''create'' a new card you can select '''<nowiki>[-- Unused cards --]</nowiki>''' slot and press ''Create'' button. You will need to specify your new card's name and size ('''8Mb''' is a recommended option because some older games will not be able to use large memory cards). ''Use NTFS file compression'' will create a file with NTFS ''compress'' flag (it will save some of your HDD space but considering the midget card size by today's standards it will not make any noticeable difference). | |||
***''Auto-Eject Memcards when loading save states'' option will momentarily eject and reinsert both selected memcards every time you load savestate while playing. This will avoid such problems as memcard corruptions if the game tightly synchronizing some internal variables with memcard's contents. Ejecting it will force the game to re-index the card contents avoiding possible desynchronization. Some games however (ex. [[Guitar Hero]]) do not like this technique. You'll have to uncheck this option in case you encounter savestates loading problems. | |||
**''Plugin/BIOS selector'': Please refer to [[#The Component Selector (Plugins, BIOS and folders configuration)|this part]] of the guide for more information on this menu item. It will allow you to configure all plugins in one dialog, but if you rather want to reconfigure a certain plugin you may prefer to use the next sub-menus -- ''Video (GS)'', ''Audio (SPU2)'', ''Controllers (PAD)'', ''Dev9'', ''USB'' or ''Firewire''. They will allow you to quickly select (or configure) for example PAD plugin or select [[#ZeroGS|ZeroGS]] instead of [[#GSdx|GSdx]] when game demands it. | |||
**''Multitap 1'' and ''Multitap 2'': These items will allow you to use up to 8 controllers through the multitap support (up to 4 for one PAD port). Prior to enabling these options however you will have to configure multitap in the ''[[#LilyPad|Lilypad]]'' plugin. Multitap support does not work with all games yet, but most games are compatible with it. | |||
**''Clear all Settings'': This item will delete all configured settings in all plugins, all core settings will be reset to their default values and the ''[[#Running PCSX2 for the first time|First Time Configuration Wizard]]'' will be open. Use this option as a last resort if your game started behaving abnormally and you are unable to find and reverse your misconfiguration. Otherwise '''stand clear''' of it because it may cost you a lot of time which you spent on PCSX2 configuration. Fortunately, it will show the confirmation dialog before proceeding. | |||
*'' | *'''Misc menu''' contains some miscellaneous options including GUI language option. | ||
*'' | **''Show Console'' item will show and hide PCSX2 debugging log window (also known as Console Window). You can use portions of information in this window when submitting a possible bug. If you are an advanced PCSX2 user you can also use some log messages to determine reasons behind hangs and slow-downs. The window may be further configured by its own menu (you can choose what to log, change its appearance and save the log to a text file). | ||
**''About'' item shows the list of PCSX2 authors (developers). | |||
**''Change language'' item allows you to change GUI language. | |||
* | |||
*'' | |||
* | |||
*'' | |||
*'''Debug menu''': This item will only appear in case you're using debug build. It will allow developers to use built-in debugger to trace code and see the contents of emulated PS2 registers and memory. It has little to no use for the ordinary users. | |||
= | ==Shortcuts/hotkeys== | ||
For a full list of currently supported keyboard shortcuts, you can refer to [[Hotkeys|this article]] or check page 4 of the PCSX2 readme. | |||
PCSX2 also supports overriding the hotkeys set by using a custom made ini file (''PCSX2_keys.ini''). For instructions on how to create it please also refer to [[Hotkeys#Editing Keyboard shortcuts|this article]]. | |||
<!--=Further reading, links and credits= | |||
This guide is based on the original [http://pcsx2.net/config-guide.html Official English PCSX2 configuration guide v1.2.1] written by '''Bositman'''. | |||
''' | The following people are also credited by '''Bositman''' in the original guide:<br /> | ||
Thanks to '''Gigaherz''' for pointing out how to make the index guide work with Firefox.<br /> | |||
Many thanks to '''Regulus''' for the background and the smilies script and for his help.<br /> | |||
Thanks to '''Razor Blade''' for fixing the image borders.<br /> | |||
Thanks to '''crushtest''' for pointing out some problems with Firefox and for his suggestions.<br /> | |||
Thanks to '''Nachbrenner''' for his suggestions and additions.<br /> | |||
Thanks to '''Falcon4ever''' for bugging me with XHTML validation.<br /> | |||
Thanks to '''rama''' for helping me with some explanations.<br /> | |||
< | |||
</ | |||
''' | |||
<br /> | |||
<br /> | |||
'''Other useful links:''' | |||
* | *To report a found bug to the developers read the following forum [http://forums.pcsx2.net/Thread-Sticky-How-to-use-this-forum-read-BEFORE-posting post]. You're going to find the instructions on how to properly report bugs in it. | ||
*More on PCSX2 command-line support can be found [[Command-line support|here]]. | |||
*Information about compiling and development can be found [http://forums.pcsx2.net/Forum-Developer-Discussion here]. | |||
*PCSX2 | *A collection of older official guides can be found on [http://forums.pcsx2.net/Forum-English-Guide the official forum]. | ||
*The official video configuration guide (for PCSX v1.0.0) can be found [https://www.youtube.com/embed/plo8rMytBNg?wmode=transparent&rel=0&autoplay=1&fs=1&start=0 here]. | |||
*A | *The translations of the official PCSX2 configuration guide v1.2.1 on different '''languages''' can be found [http://pcsx2.net/config-guide/guide-translations.html here]. | ||
*The shorter version of the official PCSX2 configuration guide v1.2.1 made by [http://forums.pcsx2.net/User-avih avih] can be found [http://forums.pcsx2.net/Thread-Quick-Start-PCSX2-Configuration-Guide-v1-0-0 here].--> | |||
* | |||
{{General articles}} | |||
[[Category:Guides]] | [[Category:Guides]] | ||
Latest revision as of 10:06, 28 March 2024
Introduction
This guide explains how to download, install and properly configure PCSX2 on Windows. It will also give some tips on how to use PCSX2 more efficiently. Keep in mind that the guide was written for PCSX2 v1.6.0 and v1.7.0 but can still be used for other versions of the emulator. If something in this guide seems confusing, please feel free to ask for help in the official PCSX2 Discord.
There is a Linux version of this guide.
Overview
PCSX2 is a PlayStation®2 emulator capable of running commercial games. It is a free and open-source project that runs on Windows and Linux. A Mac version ceased development in 2012, but with the introduction of Apple's M1 SoC, development of a new macOS version is now ongoing, spearheaded by developer TellowKrinkle.
Like its predecessor project PCSX (a PlayStation®One emulator), it is based on a PSEmu Pro spec plug-in architecture, separating several functions from the core emulator. However, as of v1.7.1420, plug-in functionality has been merged into the core emulator. PCSX2 requires a copy of the PS2 BIOS, which is not available for download from the developers due to the copyright concerns and legal issues associated with it.
Release cycle
PCSX2 operates on a hybrid rolling–stable release cycle. Rolling releases are odd-numbered (for example, 1.7.0), while stable releases are even-numbered (for example, 1.6.0). The stable release is not subject to change, while the rolling releases (known as nightlies) receive optional updates on a daily or – often – more-than-daily basis. The nightlies are the bleeding edge of what PCSX2 has to offer and are therefore often faster, more accurate, and more feature-rich. However, while updates to the nightlies are tested, they sometimes introduce small regressions – issues that weren't present before. Moreover, the location of settings is sometimes moved between rolling release versions. Some users may therefore find it more preferable to remain on the stable version.
Requirements
BIOS
You will need the BIOS files from your own PlayStation®2 console. They are not included with PCSX2 since they are copyrighted by Sony. Without them you won't be able to use the emulator at all, since PCSX2 requires these binaries to work. You'll find more information on how to dump/download the BIOS from your PS2 console later in this guide.
Minimum requirements
These are the minimum system requirements to run PCSX2. Bear in mind, however, that most games will be slow or even unplayable with these specs:
| Expand Settings |
|---|
Settings
|
Recommended requirements
These are the recommended system requirements to run PCSX2:
| Expand Settings |
|---|
Settings
|
Because of the complex nature of emulation, even if you meet the recommended requirements there will be games that will NOT run at full speed due to emulation imperfection, floating point emulation differences, issues with emulator itself or other problems.
|
Getting PCSX2
There are two versions of PCSX2 1.6.0 available for download: standalone installer and Windows binaries. There are also nightly builds (1.7.x).
Standalone Installer

This is the default option for most stable build users. The installer will contain the latest stable version of PCSX2. After opening it, you will be able to select the installation options.
First, you will be asked to provide the location for PCSX2 to install. 'Normal Installation' will install itself in your Program Files or another specified destination folder while storing user files (such as memory cards, save states, etc.) in a folder called 'PCSX2' in your 'Documents'. 'Portable Installation' will consolidate PCSX2 to one folder which you designate. Regardless of which you pick, you can also elect to create a start menu shortcut and a desktop shortcut; these are selected by default. After that, you will be able to customize which folder PCSX2 will install to. When you are satisfied with your selection, click 'Install', and the emulator will be installed to the chosen location.
 |
Warning
Remember that savestates made with a certain version of PSCX2 won't be compatible with other versions of the emulator.
Save your game's progress on your memory card before updating PCSX2!.
|
|---|
Windows binaries
This option is recommended for advanced users. You will download the archive containing the Windows binaries. You should then unpack it in a desired location and run pscx2.exe. Start menu entries or a desktop shortcut will not be created automatically. This is the ideal solution if you want to keep the application portable. You will need 7-Zip to decompress the files and the Visual C++ 2015–2019 x86 Redistributable package for this version to work.
Nightly builds
These "bleeding edge" builds are considered unstable but are perfect for those who wish to try out new PCSX2 features before they are released in an official stable build. Nightly builds can be downloaded here. They do not need to be installed.
Running PCSX2 for the first time
PCSX2 has the first run configuration wizard to help you with configuration. The emulator will automatically store all settings, memcards and any new configuration related files in your My Documents folder if you used the installer, or in the same folder where pcsx2.exe is located if you downloaded the binary version.
After installation, if you run PCSX2 for the first time, it will initiate a first-time configuration. The first step of this short process is selecting your preferred language. This can be changed at any time after setup.

In the next screen you will be able change the plugins you want to use. The plugins selected by default are the most compatible ones and will usually perform better. Do not change anything here if you are not yet familiar with PCSX2.
You can also specify a different folder for your plugins if you want, by unchecking the use default setting checkbox and selecting a folder of your choice by clicking Browse. Open in Explorer button will simply open a file explorer window in the folder you have specified.


In the third screen, you will be prompted to select one of your BIOS images from the list. If you can't see anything in this list, you need to either copy your BIOS files in the folder shown below, or change that folder to point to a location where BIOS images are saved. For more information about the BIOS, check the BIOS configuration section of this guide. Note that you will not be able to use PCSX2 without a proper BIOS image.
To finish the configuration process press Finish button. You will be taken to the main GUI (Graphical User Interface) of PCSX2:

From Config menu using Plugin/BIOS item, you can review and change the above settings or plugins used by PCSX2 at any time. More information about plugins will be given in the following section of the guide.
Configuration
The Component Selector is the plugin and BIOS configuration window that opens when you select 'Config => Plugin/Bios Selector in 1.6.0. It has three tabs: Plugins, BIOS and Folders. In later versions of 1.7, plugins are removed, and the BIOS and Folders tabs are under 'General Settings'.
Plugins
Plugins have been merged into the core emulator as of 1.7.1420. Settings are similar between 1.6.0 and non-plugin versions, but you will not need to select plugins if you are running 1.7.1420 or above.

PCSX2 1.6.0 is a plugin-oriented program. Your pcsx2.exe is the main processor that can emulate the real PS2 on the PC, but it does not work alone. It needs a graphics plugin to display the game graphics and a sound plugin to play the game sounds and music, and it also needs a pad plugin to allow you to play using your keyboard, mouse or gamepad. All plugins are stored (by default) in the plugins folder of your main PCSX2 folder.
Warning: If you select a plugin you will not be able to configure it until you press apply button!
The plugin configuration page will look like this (see the picture on the left).
Graphics (GS) plugins

GS plugins are used by PCSX2 to provide the graphical output on the screen (i.e. to render the picture). The default PCSX2 1.6.0 installation has three different GS plugins for you to select from:
- GSdx 1.2.0 (AVX2)
- GSdx 1.2.0 (SSE4/AVX)
- GSdx 1.2.0 (SSE2/AVX)
These are the same plugin compiled using different optimization instructions sets. You must use only the versions supported by your CPU otherwise the emulator may crash. The difference between these versions speed-wise is minuscule and only some games are showing any improvements in speed when using more optimized version. So if you are unsure, your safe choice is the SSE2 version. The three above are listed in order from fastest to slowest.
Note to AMD users: please do NOT confuse SSE3 with SSSE3 (1 extra S) and SSE4A with SSE4.1, they are totally different and are NOT supported on AMD systems before Bulldozer/Bobcat. Please fall back to the SSE2 plugin instead in case your system has an older CPU.
|
To use the Direct3D 11 renderer, you will have to be running Windows.
Adapter
This option will allow you to select what graphics adapter GSdx will use. It is especially useful for computers which have a dedicated graphics card and an onboard graphics chip, so that user can specify the dedicated graphics card explicitly.
Renderer
This option allows you choose the interface through which the graphics will be rendered. In 1.6.0, the renderer options are as follows:
| Expand Renderers |
|---|
Renderers
|
In the latest 1.7.x builds, the renderer options are:
| Expand Renderers |
|---|
Renderers
|
Interlacing
This option is the set of deinterlacing techniques GSdx will use to reduce NTSC interlacing effects (screen "shaking" or other artifacts). We recommend leaving this on Auto for all but some picky games.
In parentheses, you can see what kind of effect and maybe disadvantage (e.g. like the incorrect FPS readings in blend) each one of these modes have.
You can cycle through the interlacing modes ingame by pressing F5.
|
D3D internal resolution (scaling)
This option is only available if Hardware Renderer has been selected above. You can improve the visual quality of your games by increasing the resolution at which the textures are rendered. Please keep in mind that any non-native rendering resolution may cause various glitches in games (from very minor to more serious ones in rare cases). On the other hand for many games (especially for 3D ones) increasing internal resolution will improve the graphics dramatically. Note also that the higher resolution means more work for your video card, thus slowing down rendering process.
- Original PS2 Resolution - Native: GSdx will render only in internal resolution when this option is ON (that is why Custom Resolution and Scaling get grayed out).
- Scaling: This option will allow you to choose an arbitrary resolution (Custom Resolution). Or you can set it to 2x-6x so that the game's internal resolution will be multiplied by that value. For instance setting this option to 3x for a game with native resolution of 640x320 will render all scenes at 1920x960 (triple of the native resolution). Using scaling multiplier instead of custom resolution may prevent some upscaling bugs from manifesting. As of 2015 most graphics cards can easily render at x2 or x3 scaling but may get a sharp speed drop at higher settings.
Shaders section

- Enable Shade Boost: This option will help you to adjust saturation, brightness and contrast to your liking. Press Settings.. button to configure. The Reset button allows you to set the sliders to their initial positions.
- Enable FXAA: GSdx will apply the FXAA anti-aliasing algorithm to improve the visual quality of your games with a (usually) minor speed hit. You can also toggle FXAA on and off ingame by pressing PageUp.
- Enable FX Shader: Since version 1.2.0, PCSX2 is able to use external shaders for visual improvements and to add various special effects. By default, PCSX2 comes with 4 simple scanline shaders (which you can cycle through with F7 while ingame). For a huge set of shader effects which include UHQ FXAA, Bilinear FS Filtering, Bicubic FS Filtering, Gaussian FS Filtering, High Quality Blended Bloom, Per-Channel Gamma Correction, Scene Tone Mapping, RGB Colour Correction, S-Curve Contrast Enhancement, Texture, Sharpening, Pixel Vibrance, Post-Complement Colour Grading, Cel Shading, Scanline Emulation, Vignette and Subpixel Dithering you can download Asmodean's shader file from the PCSX2 forums.
Open downloaded zip file and extract PCSX2Fx_Settings.txt and shader.fx files in the same directory pcsx2.exe is located. You can change some shaders' settings by editing the PCSX2Fx_Settings.txt (the file contains all the needed instructions). External shaders should be used with caution because some of them may potentially have an enormous impact on speed. Note that you can use external shaders even with GSdx software renderer, which is the best way to get higher visual quality in this rendering mode.
You can toggle the external shaders on and off by pressing Home button while ingame.
|
Hardware mode Settings This set of options is available only if you have selected Hardware Renderer. Here you can tune some settings for extra performance or video quality.
- Texture filtering: Enables linear filtering when rendering textures. Blinear (PS2) is the default and the most accurate setting, while Nearest is the least accurate and results in blocky rendering.
- Allow 8-bit textures: Sacrifices texture decoding speed for video card memory (VRAM) requirements. In 8-bit texture mode, the plugin will utilize less memory of your graphics card storing some of the textures in 8-bit format (instead of 32-bit otherwise). This may help with some games that use a lot of 8-bit textures but may become a clog for the others, because these textures will then be decoded by the special shader consuming a portion of the card's processing power.
- Alpha Correction (FBA): (DX9 mode only) This option will make some of the textures partly transparent (when required) but may sometimes cause some slowness. Should be ON by default.
Enabled HW hacks

|
Warning
Only use these settings when you are absolutely sure that they are needed for your game to function.
These settings can cause serious graphical glitches if used in incorrect games. |
|---|
This checkbox will enable HW hacks that can be configured further using Configure button.
- MSAA: This option is used to activate multisample anti-aliasing mode. It may dramatically improve the quality of visuals but requires some additional processing power from your video card. Additionally it is highly video card memory demanding and may crash PCSX2 if the card runs out of RAM. You can set the option to 2,4,8 or 16. The plugin will automatically choose and use only the supported mode. For more information read the description at the right panel.
- Skipdraw: Skips drawing some surfaces based on how likely they are to cause issues. This option may help with removing ghost images or other post-processing effect rendered incorrectly. You should specify how many surfaces need to be skipped after the first problematic one is found. Always try lower values (like 1-3) first before using higher ones. The side effect is the increased possibility for broken/missing graphics and effects. This hack may cause random performance boosts as well.
- Alpha: Try this if your game has issues with fog like effects or shadows.
- Half-pixel Offset: This hack adds an 0.5 pixel offset to all surfaces so some common up-scaling issues may be fixed. You can try it when blur or halo effects seem to appear shifted to the upper-left corner from where they should be.
- Sprite: Gets rid of black inner lines in 2D sprites. Grayed option is recommended.
- WildArmsOffset: Lowers GS precision to avoid gaps in pixels when upscaling. It's known to help with upscaling problems for some 2D games. Read the description at the right panel for more information.
- Aggressive-CRC: Can remove effects in some games to make image clearer. Read the description at the right panel for more information.
- Alpha Stencil: This setting will disable partial transparency or prevent drawing some elements. May improve drawing shadows. Read the description at the right panel for more information.
- Nvidia Hack: Fixes odd stretching issues in certain NVIDIA drivers when upscaling (using DirectX 11). Try not to use this unless your game Videos or 2D screens are stretching outside the frame.
- Disable CRCs: The option will disable all the GSdx hacks. This will break many games; but for certain games like Shadow of the Colossus, you might like the result better.
- TC Offset X/Y: These settings can help fixing some misaligned textures when using upscaling. They will correct textures in some games, including Persona 3, Haunting Ground and Xenosaga.
Software Mode Settings This set of options will work only if you have selected Software Renderer. You can tune some settings for extra performance or video quality here. The options will not get grayed out even when you select hardware renderer so that you are able to configure both hardware and software mode. Some games may require switching between these modes (F9) so you might need to prepare everything beforehand.
- Extra Rendering threads: This option determines how many threads GSdx will use while rendering to take advantage of all the vacant cores your CPU might have (note that it will only be useable for software rendering). For example set it to 3 for quad core processors (1 for PCSX2 and 3 for GSdx software rendering). This may boost speed significantly in multi-core systems.
- Edge anti-aliasing (AA1): This may improve the resulting visuals by applying an anti-aliasing algorithm (required by emulation in some games) but will also reduce performance. This is an experimental option so it must be used with some caution.
Movie Capture
This feature will only work while you are ingame. By pressing F12 a message box for video capture will appear. You'll need to specify the place where to store video, processing codec (like for ex. x264vfw, note you'll be only able to use already installed codecs) and picture resolution. Please be aware that lossless or uncompressed video may produce VERY large files so your HDD must have enough free space to contain it.
Press F12 the second time to stop capturing. The result video will be automatically speed up to 100% even if you have experienced slowdowns while playing. If you use SPU2-X as your audio plugin the audio file recording.wav will be also recorded and saved alongside with the video file.
You can find some additional information on GSdx plugin here.
Pad (input) plugins

The default PCSX2 1.6.0 installation allows you to select the following PAD plugin:
- LilyPad v0.12.1
This is arguably the most advanced PAD plugin for PCSX2. Use configure button to open LilyPad configuration dialog.
You'll see a configuration dialog (pictured, click to enlarge).
- LilyPad supports keyboards, mouse, game pads and XBOX 360 pads. It also has some very handy hacks like ESC hack or Disable Screensaver option.
- LilyPad downside is that you will need to configure the plugin fully at least once before playing any game and it may take quite some time if you are not familiar with it.
- For a very detailed description about what each setting does and how to properly configure it visit LilyPad article and/or the official thread of the plugin.
Sound plugins

SPU2-X is the most advanced, compatible and up-to-date sound plugin for PCSX2. It was first based on Gigaherz's SPU2ghz and later modified by Jake Stine (Air). This is the only SPU2 plugin that supports audio processing effects (like reverberation and Dolby Pro Logic (if your sound card is able to decode it)). Many games only work correctly with SPU2-X.
- Interpolation: Specifies the interpolation algorithm (smoothing low frequency sounds not unlike anti-aliasing algorithms for graphics):
- Nearest: This option will disable sound interpolation. It is the fastest option but the sound may not be that good in quality.
- Linear: SPU2-X will use linear interpolation. This method is fast and the quality is acceptable.
- Cubic: SPU2-X will use cubic interpolation (slower and better in quality).
- Hermite: SPU2-X will use Hermite interpolation (slower and better in quality).
- Catmull-Rom: SPU2-X will use cubic Hermite (a.k.a Catmull-Rom) interpolation (slower and better in quality).
- Disable effects processing: This option will disable any special effects requested by games (like for example reverberation), This may speed up the emulation but some games may not sound as good as they should be.
- Use the de-alias filter: Gives more emphasis to the highs.
- Module: This option allows you to select the method (API or back-end module) of playing the sound. Normally it should not alter sound quality or speed:
- No sound: SPU2-X will not produce any sound. The fastest option suitable mostly for debugging.
- XAudio 2: Recommended for Windows users.
- DirectSound: Recommended for Windows users if XAudio 2 option does not work.
- WaveOut: Not recommended, but may be an alternative if nothing else works.
- Portaudio: SPU2-X will use a cross-platform library called Portaudio. This is the only option for Linux users.
Portaudio settings:
- Host API: This is the API Portaudio will use to produce sound, if Windows WASAPI has issues, try setting this to Windows DirectSound
- Device name: the option is used to select the specific audio device you want to output sound to.
- WASAPI Exclusive mode: This will allow SPU2-X to work in exclusive mode, blocking all other applications from using your output device.
- Output Latency: The lower the latency value the smaller audio delay you will experience. You can leave this to Use smallest possible to let the plugin decide what's best for you, or set a custom value below. Note that setting latency too low WILL cause clicks and pops in sound, so change the values until you find the lowest one that works with your game without causing issues.

- Synchronizing mode
- TimeStretch: The default and recommended setting. The options will keep audio and video in sync and it may also help to eliminate clicks and other sound problems. Note that if you cannot achieve 100% speed in game, the sound will also slow down to match your emulation pace.
- Async Mix: This option will let the audio samples play on their own making it possible for the audio to go out of sync with the video if your emulation is slow enough. You will hear normal sound even if your frame rate is not optimal. This option can cause hangs or crashes in some games so use with caution!
- None: SPU2-X will skip the sample whenever the emulation will start lagging behind. This may break the sound experience on slow machines but you may gain a small speed boost.
- Advanced: These options are only useful in TimeStretch mode and let you configure some of its parameters. Fine tuning stretching behavior may improve a perceived sound quality. Try to increase the values in case your speed is not optimal and decrease the values in case you're playing with speed higher than normal. Pressing Reset to Defaults will set all values back to their initial numbers.
Audio Expansion Mode: This option will help you to expand the ingame sound to your specific speakers or headphones configuration. This option is only supported in XAudio 2 mode (see module).
- Stereo: Default setting. Stereo sound.
- Quadrafonic: Will expand audio to 4 speakers
- Surround 5.1: Will expand audio to 5.1 surround speakers
- Surround 7.1: Will expand audio to 7.1 surround speakers
- Use a Winamp DSP plugin: This option will allow you to use Winamp DPS plugins to alter the resulting sound. It will require you to set plugin's path in ini-file (see [DSP PLUGIN] section in SPU2-X.ini file in inis sub-folder of your PCSX2 folder).
- Enable debug options: This option is only useful for developers (it will allow for extensive logging and dumps).
CDVD plugins

In most cases you will only need to use the PCSX2 built-in ISO loader (ISO option in the CDVD menu, then use ISO Selector to select actual game image from the image history list or choose Browse... to select the image from disk.
However, if you want to play a game from the actual DVD disk or to create a dump of an ISO file, use the Plugin option in the CDVD menu. It will let you use one of the PCSX2 CDVD plugins instead of ISO loader.
The default PCSX2 1.6.0 installation has one CDVD plugin:
- Gigaherz's CDVD v0.11.0
- Configuration allows you to select your DVD-ROM drive letter. This option will allow you to play directly from your PS2 DVD without dumping it to an ISO image. Put your PS2 DVD disk in the selected drive before starting emulation.
Dev9 (HDD and ethernet) plugins
Dev9 is a collective name for plugins that handle HDD and ethernet (LAN/Internet) access.
By default PCSX2 installation has only one plugin Dev9null v0.5.0, which is null plugin used as a stub. However there is a newer Dev9 plugin in development by Luigi__ named MegaDev9. The plugin is still in its early development stage at this time (early 2015) but it can already partially emulate HDD. You can get it from here.
Also there is an experimental Ethernet plugin from gigaherz and drkIIRaziel named DEV9giga-razi. Even with the most of Sony game servers down you can still give it a try. It can be downloaded using this link.
Make sure you follow the how to play online guide.
|
USB emulation plugins
As with Dev9 plugins PCSX2 does not currently have any official working plugin to properly emulate USB access. The release package includes only USB Null v0.7.0 which is yet another stub plugin. However
there is a USB plugin called Nuvee that supports USB mice, keyboards and lightguns by Shalma. You can get it from here.
Additionally, there is a new plugin by jackun called USBqemu wheel mod emulating steering wheels. The plugin is a modification of an old USB Qemu plugin. USBqemu is fully capable of supporting various steering wheels. For more information visit the plugin's dedicated thread on the forums and/or you can download it using this link.
Firewire emulation plugins
At this moment, there are no official or unofficial working Firewire plugins for PCSX2. The included plugin FWnull v0.7.0 is a stub akin to Dev9 and USB plugin stubs.
BIOS
Obtaining PS2 games can be as easy as buying PS2 DVDs off eBay. However, an original game DVD is not enough to make PCSX2 work. You'll also need the BIOS dumped from your PS2. Unlike the PS2 PCSX2 does not implement region locking so if you have a PAL BIOS in your PS2 you can still play NTSC games, and vice versa.

The BIOS tab of the Plugin/BIOS selector window will allow you to select a BIOS image from the list of BIOSes available to you or to specify the folder where these images are stored.
|
Warning
Note that the only legal way of obtaining a BIOS image is to dump it from your own PlayStation®2 console. Do not attempt to ask where to get BIOS images on the PCSX2 forums, because it's against the forum rules. The PS2 BIOS is copyrighted material of Sony Corporation. It is illegal to distribute the copyrighted files without copyright holder consent. PCSX2 team could get in trouble if suspected of illegally supplying people with BIOS files!
|
|---|
If your BIOS image does not appear in the BIOS images list and you are sure that you have selected the correct folder, you may what to try dumping your BIOS again because the one you have is probably not valid or corrupted.
Note that it is not recommended to use the first Japan version of BIOS (SCPH-10000.bin). You will probably be able to run the games with it but there is a chance to affect compatibility somehow. Although the first PS2 consoles should be really hard to get these days.
Interesting fact: For maximum compatibility it is recommended that you use a BIOS image different than SCPH10000.BIN which is the oldest one. That's because with this BIOS there are problems in memory card emulation and in other sections. auMatt.
|
The dumping of BIOS is a complicated process so follow the instructions you can get from this thread. You can start dumping by downloading the tool from this page or refer to the official guide here. Also, here is a YouTube tutorial on dumping your BIOS (by FullGrownGaming).
Apart from the main BIOS file (SCPH-XXXX.bin must be exactly 4Mb of size) your BIOS files collection may include rom1.bin,rom2.bin,erom.bin and SCPH-XXXXX.nvm files (note that XXXXX is the version of your BIOS, e.g. SCPH-34004.nvm and SCPH-34004.bin). The last file contains some PS2 common and regional settings and it can also be created by the PCSX2 itself after you configure your BIOS while in emulation mode (set time zone, language, etc.) but it would still be fine to dump this file directly from your console.
Interesting Fact 2: The first Japanese PS2 had a single BIOS and the DVD player was installed on the MemCard. The PS2 consoles following the first model had the DVD Player software installed in a separate ROM (EROM) which is encrypted. The ROM1 is an additional part of the BIOS that contains excess info and items, such as IDs for the DVD Player version. ROM2 is quite similiar, but (potentially) exclusive to Chinese PS2s. auMatt.
|
Folders

This page will allow you to select different folders to store savestates, snapshots or system logs. Uncheck the Use default setting checkbox to be able to choose the required folder.
Emulation Settings (Core configuration)
Emulation Settings config window is the collection of main PCSX2 settings to tune the behavior of PCSX2 itself (not unlike the plugins separate configurations can tune the behavior of a particular plugin). You can access the window from Config => Emulation settings menu. There are 6 tabs, EE/IOP, VUs, GS, GS Window, Speedhacks and Gamefixes each of which has its own set of settings.
EE/IOP

EE/IOP tab stands for Emotion Engine / Input Output Processor which are the core components of the PlayStation®2. The tab contains 4 settings.
- Emotion Engine: Enables or disables recompiler (i.e. the program that translates the native PS2 code into the native x86 code, instead of slowly interpret each PS2 command) for PS2 Emotion Engine (EE) processor emulation. Interpreter mode disables the recompiler making the emulation painfully slow. Recompiler mode is extremely compatible, so the interpreter mode shouldn't be used for anything but debugging purposes.
- Enable EE Cache: Used only with interpreter mode, and only known to help the Japanese version of Dead or Alive 2.
- IOP: Enables or disables recompiler for PS2 Input Output processor (IOP). You should also leave this option enabled.
- Round mode: Changes the rounding method for float numbers. Intel/AMD x86 CPUs and PS2 CPUs use somewhat different floating numbers implementations. Recompiled program running in the native x86 code may sometimes calculate slightly different numbers. As insignificant as it may sound this difference can really break games to the point of crashing and black screens. Unfortunately there is no real way to fully implement PS2 CPUs behavior when it comes to floating point arithmetic so PCSX2 will allow you to use a collection of different approximations known to work better for some games while breaking the others. If your game is freezing, try changing this value. Default and the most compatible setting is Chop/Zero. This default value will be changed automatically for some games known to need a different value when Automatic Gamefixes mode is enabled (see System main menu).
- Clamping mode: Changes the implementation of emulation of INF and NaN numbers. Same as with rounding FP numbers the implementations of INF (infinity) and NaN (not a number -- reserved byte combinations could not be translated in any real FP number) in PS2 CPUs are different from x86 CPUs. And same as with FP numbers this obstacle cannot be gracefully overcome. This setting will allow you to choose one of four approximations of PS2 CPUs INF/NaN behavior, each of which is more compatible than the previous one in the cost of emulation speed (being more compatible in this case will require additional checks and code tricks each time FP number is calculated). These modes go from faster to slower. None is the fastest but the least compatible mode and Full is the slowest but the most compatible mode. By default the value is Normal which will work fine for most games without compromising the speed much. This default value will be changed automatically for games known to need a different value when Automatic Gamefixes mode is enabled (see System main menu).
- Restore Defaults: This button will restore all settings to their default values (which are seen as in bold or green font).
VUs

VUs stand for Vector Units which are the PlayStation®2 co-processors working in parallel with the EE and IOP CPUs. The PlayStation®2 has two VUs called VU0 and VU1.
- You can change VUs compilation modes independently for VU0 and VU1 (although it makes sense to set them to the same value). As with EE and IOP CPUs there is an old and very slow interpreter mode which is useful only for debugging. VUs however have two different recomplilers -- microVU (more compatible default recompiler) and superVU (legacy less compatible recompiler used mainly for debugging, but it can be slightly faster). It is recommended to leave both settings at their default microVU Recompiler value.
- VU0/VU1 Advanced recompiler options let you select Round mode and Clamping mode for floating point numbers emulation much like with EE and IOP CPUs modes (see above).
- Restore Defaults button will restore all settings to their default values (which are seen in bold or green font).
If you experience spikey polygons (SPS) or bad geometry, try setting Clamping mode to Extra + Preserve Sign.
|
GS

GS stands for Graphics Synthesizer PlayStation®2 co-processor responsible for rendering the graphics (but is also used by some games for additional calculations and other purposes). The PCSX2 will work in conjunction with the selected GS plugin (like for ex. GSdx plugin) to emulate PS2 graphical co-processor and convert its output into input understood by the PC video cards.
- Framelimiter: The options in this group can be used to control the frame rate of your games in various ways.
- Disable Framelimiting: With this option enabled the frame rate will only be limited by the power of your PC. It will not however increase the game performance in case the game runs slow. This option may be useful when you want to skip some repetitious sections of the game. You can toggle it while playing by pressing F4.
- Base Framerate Adjust: This option will allow you to adjust the base framerate for your games by a percentage. The emulator will limit the game frame rate by the base NTSC (59.94 FPS) or PAL (50 FPS) constants. Frame rate will be increased or decreased according to this value. Again, this option will not speed up the slow game it may only limit the frame rate of a game performing faster than needed on your PC.
- Slow Motion Adjust and Turbo Adjust: PCSX2 has two additional frame rate modes that you can freely switch to while playing a game. Slow Motion mode can be switched (on and off) by using Shift-Tab and Turbo mode be switched by just using Tab key.
Pressing Tab while playing a game will increase a frame rate to a certain point (if your PC allows it); F4 will disable frame limiter completely. You can also use Shift + Tab to slow game game down. Pressing the key combination the second time will restore the original frame rate
|
- NTSC Framerate and PAL Framerate: These boxes indicate the base frame rate to limit the speed of NTSC or PAL games. The default values are 59.94 FPS and 50 FPS respectively. These values can be changed only by editing the pcsx2_vm.ini (in inis folder of PCSX2, see FramerateNTSC and FrameratePAL variables). It is not recommended to change them because it will break a number of games (but note that decreasing the values can speed up a few games).
- Frame Skipping: Frame skipping is a technique which tells the emulator to refrain from drawing some frames making it possible to increase the perceived game performance when the normal game speed can't be achieved by other means. PS2 internal design (the way GS processor's output and communications are implemented) does not allow for the precise frame skipping. Although this feature may help some slow games to work smoother, it will inevitably cause stuttering, flashing or other abnormal behavior in other games, so use it with cation and do not forget to disable it when you're about to switch to another game. Frame skipping can be toggled while ingame by pressing Shift + F4. The following frame skipping modes are available:
- Disabled: This option will have frame skipping disabled (you can still enable it by the mentioned Shift + F4 combination)
- Skip when on Turbo only: This option will enable the feature automatically in Turbo mode (see above, use Tab to toggle the turbo mode while ingame)
- Constant Skipping: This allows the frame skipping to be enabled by default.
- Frames to Draw and Frames to Skip: These boxes allow to adjust the frame skipping mechanism to your liking. You can specify how many frames will be drawn before skipping (Frames to Draw) and how many frames will be skipped prior to start drawing again (Frames to Skip). Default values are 2 and 2.
To enable frame skipping while playing press Shift + F4. Press this combination again to disable it.
|
- Use Synchronized MTGS: This will enable a different MTGS mode. The mode is very slow and useful for debugging purposes only.
GS Window

This tab will allow you to control the PCSX2 GUI game window (video output window) behavior:
- Aspect Ratio: You can select the window aspect ratio (shape) here. If you have a widescreen (16:9) monitor you may want to remove the left and right black bars to get a better experience. Unfortunately many games do not natively support wide screen aspect ratio and selecting it here will cause the image to stretch which may not be a desirable side effect. Some games however may be helped to support 16:9 resolution by special widescreen patches made by the community. If the game neither have the native 16:9 support nor the patch to overcome this your only options are to play it with 4:3 aspect ratio with black bars or bear with image stretching whichever option is the best for you. You can choose Standard (4:3), Widescreen (16:9) or Fit to Window/Screen here. In the latter case image will always be stretched.
|
- Custom window size: This option lets your define the GS window size in pixels. Note that this does not affect the game's rendered resolution, image quality or speed in any way. Your game sessions will always start with the window size you have selected here.
- Zoom: This option will zoom in or out the rendering image (around the central point). It may help in certain situations (decrease black bars for instance by zooming them out of the view). You can also use this feature while in game by pressing Ctrl and numpad + to zoom in, Ctrl and numpad - to zoom out and Ctrl and numpad * to reset zoom too 100%.
There is also a hidden key combination to stretch GS window while in game only vertically. Use Ctrl + Alt and numpad +, numpad - and numpad * to increase, decrease or reset vertical stretch. This option may be useful when you need to remove vertical top and bottom black bars but remember that the image itself will get stretched and will lose original proportions.
|
- Disable window resize border: This option will remove the black bars used as resizing padding from the GS window.
- Always hide mouse cursor: This option will disable drawing the mouse cursor anywhere within GS window. This may be helpful if the mouse is used for aiming in game.
- Hide window when paused: With this option enabled, the GS window will be hidden whenever emulation is paused.
- Default to fullscreen mode on open: This will instruct PCSX2 to start emulation in fullscreen mode. Switch back to windowed mode by pressing Alt + Enter.
- Double-click toggles fullscreen mode: Enables to use double-click to switch between fullscreen and windowed modes (along with Alt + Enter)
- Wait for vsync on refresh: When checked, PCSX2 will use vertical synchronization when drawing frames. Vsync can reduce image tearing but will also greatly reduce actual FPS. This option will only apply to fullscreen mode and may not work with all GS plugins.
Speed Hacks

Speed hacks are various techniques used to speed up emulation at the cost of emulating accuracy. All of these options can cause severe bugs, crashes and other abnormal behavior so use them with caution! Some games may benefit from these settings immensely while others can be slowed down or broken. Read the on-screen hints and messages to get more information (especially if you're new to this) they will help you not to break anything.
If your system is powerful enough to emulate your game in full speed you do not need to enable anything here because none of these options can improve compatibility.
| Expand Speed Hacks |
|---|
Speed Hacks
|
Game fixes

This tab contains some game-specific hacks and fixes. These fixes are disabled by default but enabled automatically if the game in question is detected to be running. The Automatic Gamefixes option can be also switched off (although it is not recommended) in System sub-menu of PCSX2 main menu. You should not enable these hacks unless you have a game that somehow was not detected by PCSX2 automatically (note also that some of these fixes are not applied automatically).
The game-specific fixes are temporal solutions to some unresolved emulation issues. PCSX2 developers provided them to increase compatibility levels so some games, otherwise broken, can still be enjoyed. As the emulation compatibility will continue to improve some of these options may become obsolete and will be removed.
Most of these hacks are needed because the PS2 has different float arithmetic than x86 CPUs. Some of these differences do not lead to any problems, others however may cause serious issues in certain games. You can read hacks descriptions and hints to get more information.
| Expand Fixes List |
|---|
Fixes List
|
Presets
For those users do not want to spend the time fiddling with all the hacks, fixes and speed-ups described above and especially for the new users who wants to start playing games right away the system of options sets or presets was introduced. This system will restrict you to only 6 slider positions instead of myriad options and PCSX2 will automatically assume using specific options, game fixes and speed-ups according to the presets level you choose. Check Preset checkbox on the botton of settings window to enable using presets. This will disable most of the options on many tabs (because they will now be controlled by PCSX2 automatically). Presets go from the safest (but also the slowest) to the most unsafe (but the fastest one). You should start with level 1 or 2 if you have a powerful machine. Level 3 and 4 are for those who do not have a good machine or have a very demanding game to emulate. Level 5 or 6 are not recommended and should only be used as a last resort (some game can even be slowed down by those levels).
In 1.7, presets 4–6 have been removed.
The PCSX2 1.6.0 main menu consists of six sub-menus, called System, CDVD, Config, Misc, Debug, and Capture. The 1.7.0 main menu is mostly the same, except that Misc is absent and that it now contains a Help sub-menu.
- System menu contains system-wide switches and options.
- Boot CDVD (full): This item will allow you to load and start your game from the source configured in your chosen CDVD plugin. If you did not configure any CDVD plugin the emulator will start the previously used ISO image or will ask you to select one if this is the first time you use ISO loader. This particular option will load BIOS first which in turn will load the game itself. Loading BIOS will take time but some games may use language configured in BIOS thus allowing you to play in your language (ex. Jak 3). Some game may need BIOS to initialize internal variables, and may refuse to start otherwise (Amplitude or Lara Croft Tomb Raider: The Angel of Darkness). Most of the games however does not necessarily need to be started from BIOS in order to function properly. And there are games that will refuse to start correctly through BIOS (ex. Burnout Dominator).
- Boot CDVD (fast): This item will not load BIOS before starting your game. It is safe to choose this option for the majority of games.
- Run ELF...: This item will let you load a single executable ELF-file. Most PS2 home-brew demos are in ELF-format. However the mode is not suitable to run commercial games.
- Pause/Resume: This item will be enabled until you start a game. You can pause and resume the game any time during your game session.
- Load State: This item will allow you to select and load a savestate from one of the 10 save slots. Additionally there is a backup state which will contain the last overwritten savestate (so you have a last chance to restore your save when you accidentally overwrite it or the written state appeared to be corrupted). This item will only be active when you're ingame.
- Save State: You can save a game state in one of the 10 save slots. This item will only be active when you're ingame.
- Backup before save: Unchecking this option will disable the backup savestate (see Load State description).
- Automatic Gamefixes: This item will enable or disable automatic application of game fixes. See game fixes for more info.
- Enable Cheats: This item will enable or disable automatic application of game cheats. Cheats are pnach files located in PCSX2 cheats folder. These files have multiple purposes from making your game playable (if nothing else helps) to circumventing some in game restrictions (adding more money or making your ingame character immortal, see game cheats and memory editing for further information). You can find the big library of cheats on the forums in this thread.
- Enable Widescreen patches: This item will enable the additional folder cheats_ws to load pnach files from. You should use it to store widescreen patches for your games. See some information about it here. You can find the big library of patches on the forums in this thread.
- Enable Host Filesystem: This item will enable or disable the file system extension that may be used by home-brew developers to load files from your (host) machine. See some more information (or alternatively) if you're interested.
- Shutdown: This item will shut down the current game you are playing and reset PCSX2 (it will not close PCSX2 itself).
- Exit: This item will close the emulator.
- CDVD menu contains options for PCSX2 internal ISO loader.
- ISO Selector: This item will allow you to select one of the recent ISO images or add new ISO image to the list by using browse.. item. The image you selected here can be booted in system menu (see description above).
- Plugin Menu: This item will let you quickly choose CDVD plugin and access its configuration (rather than going through plugins configuration). The menu will only be accessible if you choose Plugin item in CDVD menu menu (i.e. if you prefer to boot your game using plugins instead of internal ISO loader).
- ISO, Plugin and No Disc items: You can only select one of the three options. Choose ISO if you want an internal ISO loader to boot your ISO image (you cannot play off the real DVD disk this way), choose Plugin if you prefer to use a plugin for this task (remember that plugin needs to be configured before use, see CDVD plugin). No Disc option will allow you to run only BIOS (as if you started PS2 console without inserting any DVD). You can configure your language in BIOS options before playing some games that may use BIOS to determine your language preferences.
- Config menu will allow you to access plugins' configurations and core emulation settings (all of these options were described above)
- Emulation Settings: Please refer to Emulation Settings.
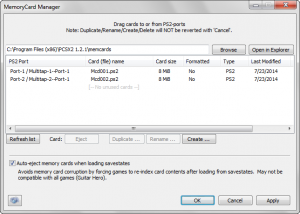
The Memory Card manager - Memory cards: Will open the memcard manager able to manipulate your virtual memcards:
- You can specify a custom folder for memory cards using browse button.
- Open in Explorer will open the selected folder in Windows Explorer (to access its contents).
- Selecting a memcard from the list will allow you to Duplicate, Rename or Delete it.
- Eject button is available when you select one of the two active memcards. Ejecting memcard will not delete its contents it will only make the card inactive disallow PS2 games to use it in any way. To insert card in one of two available virtual card slots, select a disabled card, press Insert button and choose a virtual port to insert your card to (any memcard already in this port will be automatically ejected and disabled).
- To create a new card you can select [-- Unused cards --] slot and press Create button. You will need to specify your new card's name and size (8Mb is a recommended option because some older games will not be able to use large memory cards). Use NTFS file compression will create a file with NTFS compress flag (it will save some of your HDD space but considering the midget card size by today's standards it will not make any noticeable difference).
- Auto-Eject Memcards when loading save states option will momentarily eject and reinsert both selected memcards every time you load savestate while playing. This will avoid such problems as memcard corruptions if the game tightly synchronizing some internal variables with memcard's contents. Ejecting it will force the game to re-index the card contents avoiding possible desynchronization. Some games however (ex. Guitar Hero) do not like this technique. You'll have to uncheck this option in case you encounter savestates loading problems.
- Plugin/BIOS selector: Please refer to this part of the guide for more information on this menu item. It will allow you to configure all plugins in one dialog, but if you rather want to reconfigure a certain plugin you may prefer to use the next sub-menus -- Video (GS), Audio (SPU2), Controllers (PAD), Dev9, USB or Firewire. They will allow you to quickly select (or configure) for example PAD plugin or select ZeroGS instead of GSdx when game demands it.
- Multitap 1 and Multitap 2: These items will allow you to use up to 8 controllers through the multitap support (up to 4 for one PAD port). Prior to enabling these options however you will have to configure multitap in the Lilypad plugin. Multitap support does not work with all games yet, but most games are compatible with it.
- Clear all Settings: This item will delete all configured settings in all plugins, all core settings will be reset to their default values and the First Time Configuration Wizard will be open. Use this option as a last resort if your game started behaving abnormally and you are unable to find and reverse your misconfiguration. Otherwise stand clear of it because it may cost you a lot of time which you spent on PCSX2 configuration. Fortunately, it will show the confirmation dialog before proceeding.
- Emulation Settings: Please refer to Emulation Settings.

- Misc menu contains some miscellaneous options including GUI language option.
- Show Console item will show and hide PCSX2 debugging log window (also known as Console Window). You can use portions of information in this window when submitting a possible bug. If you are an advanced PCSX2 user you can also use some log messages to determine reasons behind hangs and slow-downs. The window may be further configured by its own menu (you can choose what to log, change its appearance and save the log to a text file).
- About item shows the list of PCSX2 authors (developers).
- Change language item allows you to change GUI language.
- Debug menu: This item will only appear in case you're using debug build. It will allow developers to use built-in debugger to trace code and see the contents of emulated PS2 registers and memory. It has little to no use for the ordinary users.
Shortcuts/hotkeys
For a full list of currently supported keyboard shortcuts, you can refer to this article or check page 4 of the PCSX2 readme.
PCSX2 also supports overriding the hotkeys set by using a custom made ini file (PCSX2_keys.ini). For instructions on how to create it please also refer to this article.
| |||||||||||||||||